A Spring day on the edge of never ending Winter.

He missed a wonderful view of a snow capped Ingleborough in the distance.


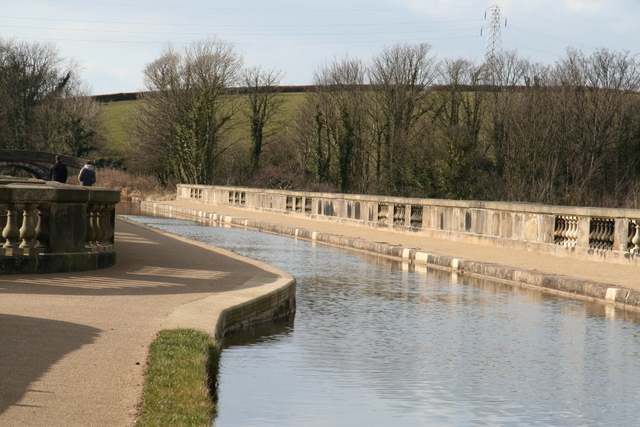
Here we are in the last days of March, Easter has arrived but spring is yet to be sprung. The sun was finally shining and the temperature mild so My Dearest and I went for a walk this afternoon. I took him to see the Aqueduct, a beautiful late 18th Century stone built bridge which carries the Lancaster Canal over the River Lune.

Built in 1797 and still beautiful.

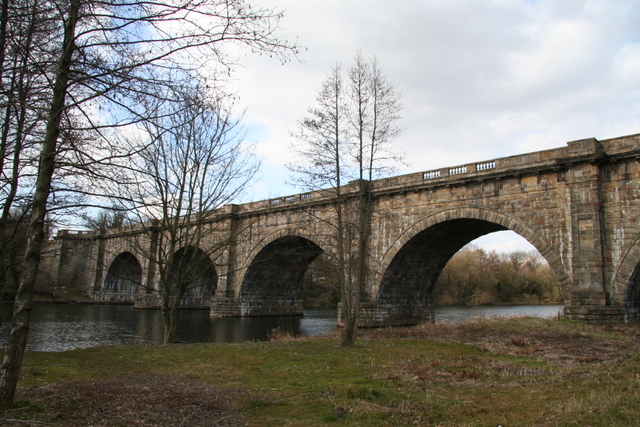
Opened in 1797 it has recently been refurbished as part of a scheme to reopen the river path which was once known as Ladies Walk, but has become unloved and surrounded by industry. New paths have been built and undergrowth cut back to allow walkers and Cyclists a better view of the river.

We walked from the Aqueduct to the Viaduct, which carries the motorway over the River. What a striking difference we were faced with, from the beauty and elegance of 18th century engineering, to the rough brutalism of the mid 20th century.

Built a1966, and eternally ugly

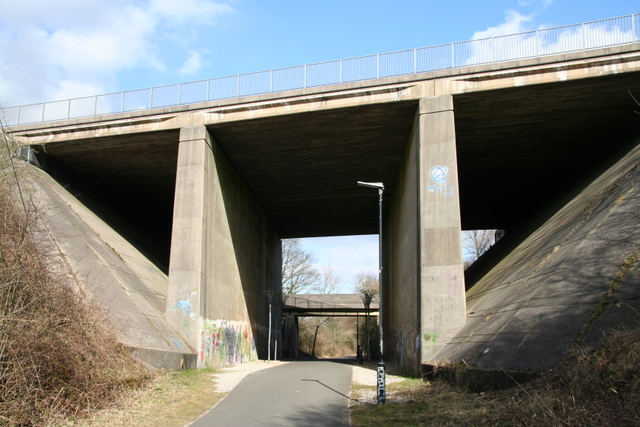
I can’t help thinking what a pity it is that beauty is less often a consideration when designing our built environment. Did no-one think “this bridge will stand for centuries let’s make it something to admire”? They did in the 18th century. But then in the 18th century the built environment was built by educated men of wealth (well that which still stands was) who wanted to make their mark and be proud of it.

coltsfoot


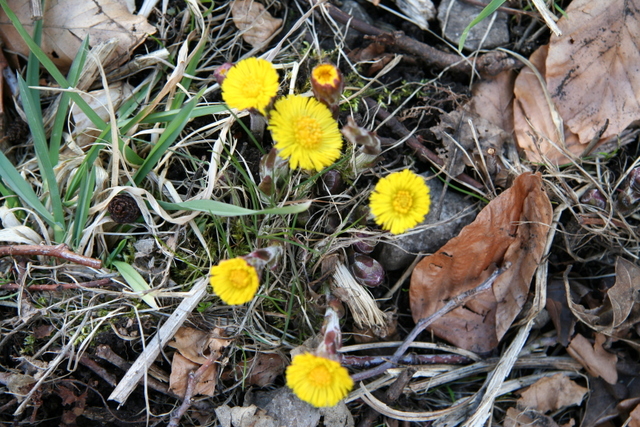
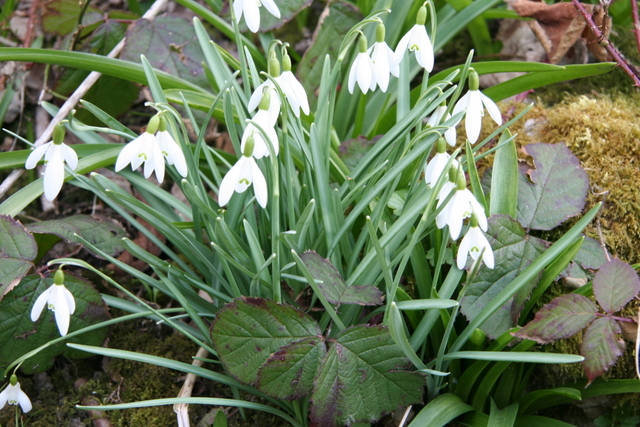
We were disappointed to find very little evidence that spring is here, no fresh green leaves no spring flowers only a lonely group of colts foot pushing through the debris of last Autumn, and a solitary group of snow drops amongst the briars.

Snopdrops


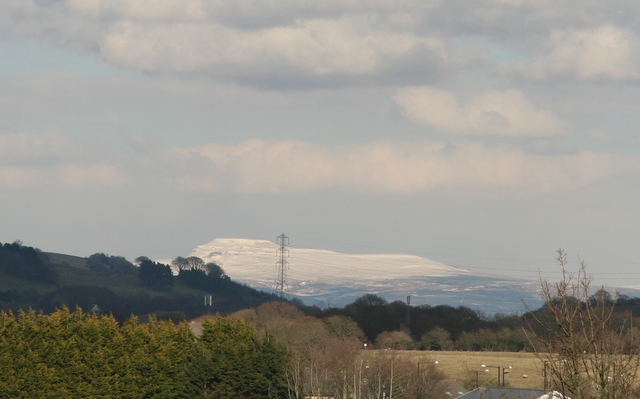
I climbed the banking from the Riverside up to the canal path with my Dearest,however he doesn’t do heights, when he saw how high it was he went back down while I walked the canal path.

Lancaster canal crossing the river Lune

He missed a wonderful view of a snow capped Ingleborough in the distance. I wish I had a better lens on my camera to capture that scene, but then my camera is heavy enough, any heavier and I wouldn’t carry it, and then none of these pictures would have been captured, there has to be a balance in life.

Snow Ingleborough

In the car park we found an image on the railings, it’s a copy of a work by a local Artist Chas Jacobs I have a number of prints of his work, I love the bright colours and naive images of familiar local landmarks. this one has the aqueduct in the foreground and Ingleborough in the background.

Chas Jacobs Print
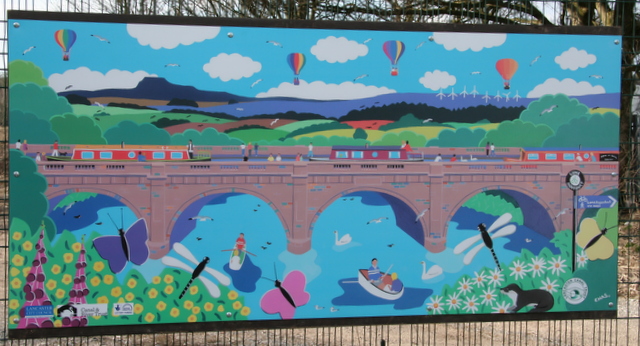
http://www.chasjacobs.co.uk

Warm hands; Cold heart, or so the saying goes.

Some of the creams are evidently different from their neighbours, if one person had made all the blocks, all the creams would match

I do have warm hands, always, and so I make lousy pastry, the saying would have me cold hearted too. Blue hearts may look cold too but they make an easy to make, simple quilt.

cold cold hearts

The quilt belongs to my mother, I don’t actually remember it being made but I’m pretty sure it must be a block of the month challenge, each heart just a four patch; 3 blue squares and a cream one, set on point alternating with plain cream squares. Some of the creams are evidently different from their neighbours, if one person had made all the blocks, all the creams would match, or there would be a selection of creams carefully placed to balance across the quilt.
It’s such a simple rustic quilt , quilted and tied, no need for anything elaborate.

Let’s twist again like we did last Summer

it’s never a good idea to use bias cut fabric , bias cut edge to bias cut edge if you can avoid it, but if you cut same size squares on straight grain, and
join then alternately bias cut edge to straight grain edge, you can produce a string of coloured squares to use as a border,

These two quilts are another mother and daughter effort, the first is mine using my favourite bright colours, with black. The second is my mother’s, rich colours which tone beautifully together.

Mulitcoloured Twister quilt

The block is known as Twister, it looks rather complicated, and whilst it does take some planning and a large workspace is helpful it is actually fairly simple to achieve.
First task is to cut out squares and put them together in a grid bearing in mind that each square will tessellate with its neighbouring squares in the finished article, so each square should be sufficiently different from its neighbour to give the definition you want.

Mum's twister quilt

Once you have a grid maybe 20 percent larger than the finished article you plan, you take your scissors to it cutting it up using a template guide. At first it may seem that there is a profligate waste of fabric as you do cut to waste. A large bias square is cut from the centre of each square, I set these aside to use in the border. As each new square is cut diagonally from the fabric with the intersection of the squares as the centre of the new squares you cut, you should then rotate the square 90 degrees and set it back next to its neighbour. You will find they begin to tessellate; now you see why you need to have a large workspace, because you need to set out the entire quilt top, each piece placed by its neighbour, to get the placing correct.

http://www.pinkchalkfabrics.com

You will have a collection of little bias cut squares left over, now it’s never a good idea to use bias cut fabric , bias cut edge to bias cut edge if you can avoid it,because both edges will stretch. If you cut the same size squares on straight grain, and join them alternately bias cut edge to straight grain edge, you can produce a string of coloured squares to use as a border, it will still stretch a little if you are not careful, but at least there will be no waste. I cannot bear waste.

The first quilt I made in this pattern I can’t find a photo of, probably because it was photographed long before I discovered digital photography, in fact it may have been made before digital photography existed.( Do you know how old that makes me feel?) It was a cot quilt made for a friend at the birth of her daughter, and was in pretty pinks and blues and on a very small scale, hand quilted in circles.

Fibonacci: a lesson from the 12th Century

When I have a few hours to spare…. Some time in the next 5 years! I think I have the right two fabrics to make another one of these.

Here are two more quilts made from the inspiring work of Ricky Tims, not mine I’m afraid, these two were both made by my Mother.

Egyptian math

The first probably made at the same time as my first and to the same instructions, I think we may have been lent a book or attended a workshop together.

W.I. challenge quilt

The second, I’m sure was made in response to a Women’s Institute Challenge to use a particular challenge fabric inspired by Gustav Klimt. Or perhaps it was made from the left over fabric. The lime and copper fabrics look to be plains while the other two fabrics are patterned fabrics which have patterns taken from the paintings of Klimt, I particularly love the blue.

When I have a few hours to spare…. Some time in the next 5 years! I think I have the right two fabrics to make another one of these.

Every quilt deserves a label

If the label goes on before the quilt is put together and quilted through, then it’s difficult to remove, it can only be covered up by someone who might wish to change its history or attribution, ( I mean pass it off as their own) later to be happily rediscovered, when the stitching begins to come apart.


I have used a spare apple core for the quilt label, and my lovely Janome sewing machine supplied the pretty script to write the words, “Scrappy Apple Core Quilt” My name and the date. It’s really important to put a label on the back of every quilt you make and to put it on before you put the quilt together and quilt it. Why? Many reasons; posterity for one, if your quilt is treasured and survives for hundreds of years as some do, the owners will one day wonder who made it, when and why – so tell them.

scrappy Apple core quilt label

Quilts are used to evidence the history of fabrics and fashions but only if they can be reliably dated. Let the historians be happy to have found a dateable treasure in your quilt.
If the label goes on before the quilt is put together and quilted through, then it’s difficult to remove, it can only be covered up by someone who might wish to change its history or attribution, ( I mean pass it off as their own) later to be happily rediscovered, when the stitching begins to come apart.
If the quilt is made specifically for a person or to celebrate an event in someone’s life, then put it on the quilt label, but be warned….. I once heard of a quilt that was made to celebrate a marriage, it took so long to make that the couple had divorced before it was completed.
scrappy apple core quilt backing
The backing was a happy find in my stash, it’s what was left over from the backing of a much larger quilt, the left over piece was too wide but not long enough, however there was a long strip that I cut off the side of the previous quilt backing, so I managed to stitch on the strip and make a square big enough for the backing of this quilt. There’s a little bit over, perhaps it will back the cushion I might make to go with the quilt. And there’s even enough for the hanging sleeve, how lucky is that!

On the subject of being lucky

With a heavy heart I reached for the secret yellow stash, cut a couple of apple cores and threw them into the mix… presto! The whole thing started to come together.

Going back to the Sizzix Big shot, I have now solved my little dilemma, and indeed the dreaded yellow was the answer. I had spent a few nights trying to think how I might avoid using the dreaded yellow and came up with an idea that a lime or apple green might work but on looking again at what was already cut I found I had already introduced a pale apple green, so that would not work. With a heavy heart I reached for the secret yellow stash, cut a couple of apple cores and threw them into the mix… presto! The whole thing started to come together.

first Apple Core Quilt

Then I went to my stash for a royal blue for the border but again…. it just wasn’t working, so off to the fabric shop I went,…..lavender blue? no, Airforce blue? no, Navy blue? no…..what about turquoise? Turquoise it is! I may even bind it in yellow too, but I’ve got time to ponder that while I do the quilting.
So next dilemma… how to quilt, and what to back it with?