Advent Calendar

Traditionally, (I’m talking about my childhood in the 1960’s), Advent Calendars were a just paper, or card, the little windows had no chocolate or treats behind them, only a little picture and I remember the excitement of seeing what might be behind the little door each day.

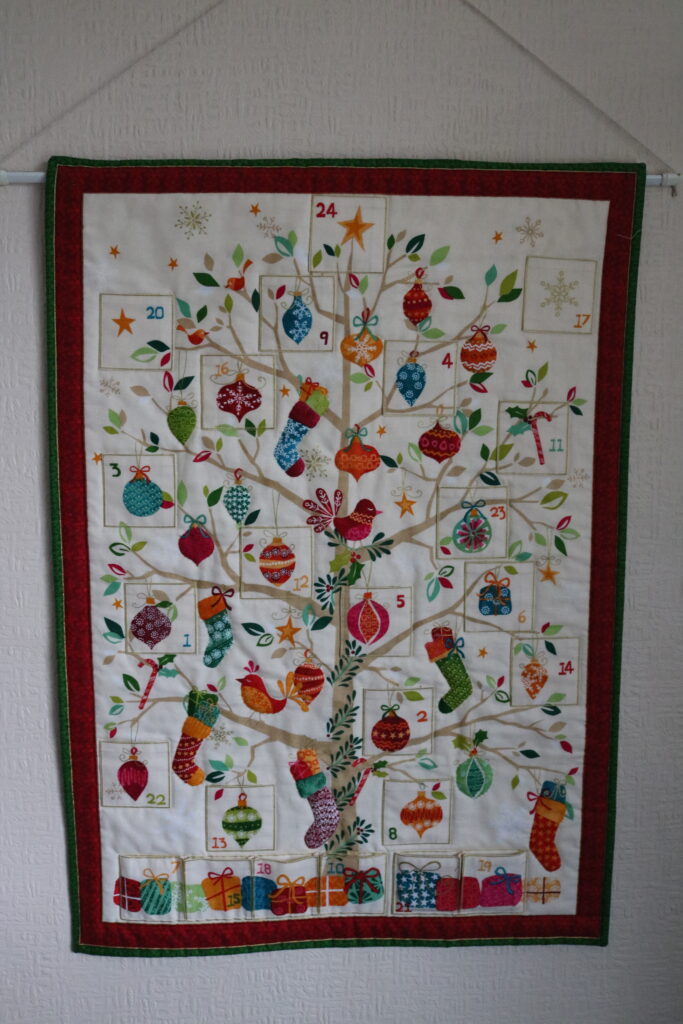
I finished this in January of this year; I’d found the Advent Calendar panel, bought years ago, in amongst some Christmas fabrics when I was looking for something else.  I decided that although I’d not get it done for Christmas, Advent was almost half way through, I’d start and plan to finish it, a stitch in time, so that I could hang it for Advent 2021.

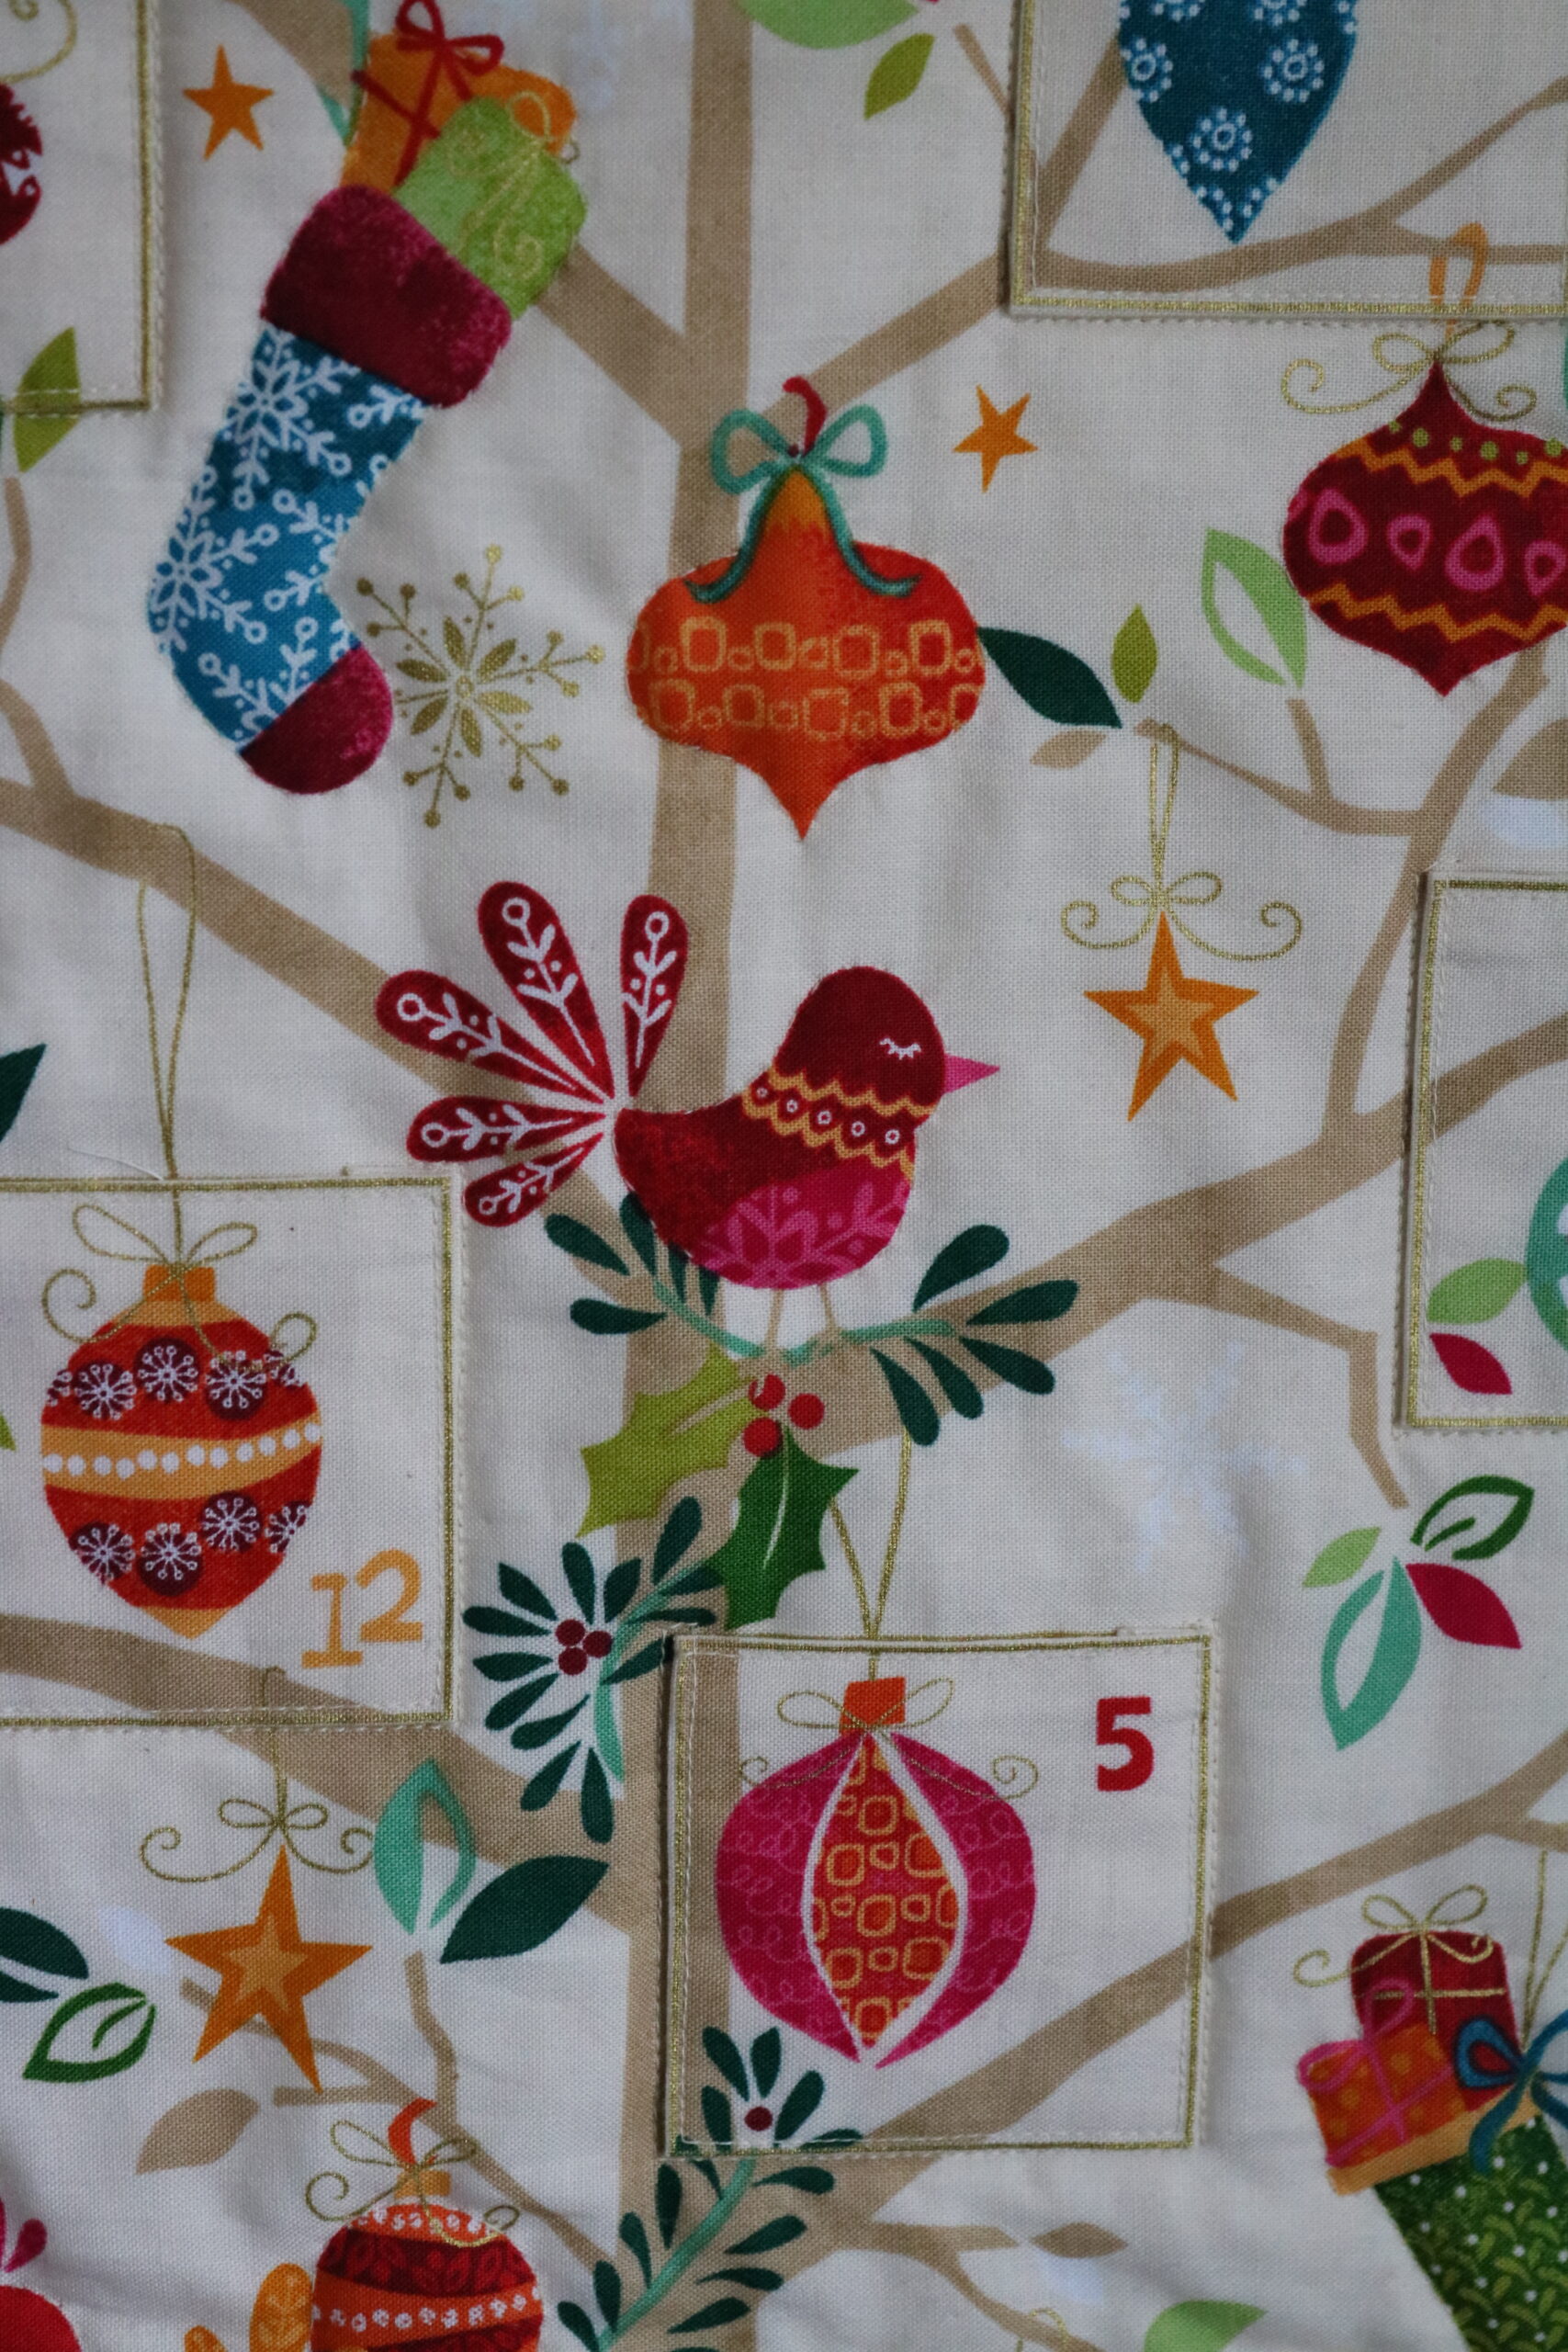
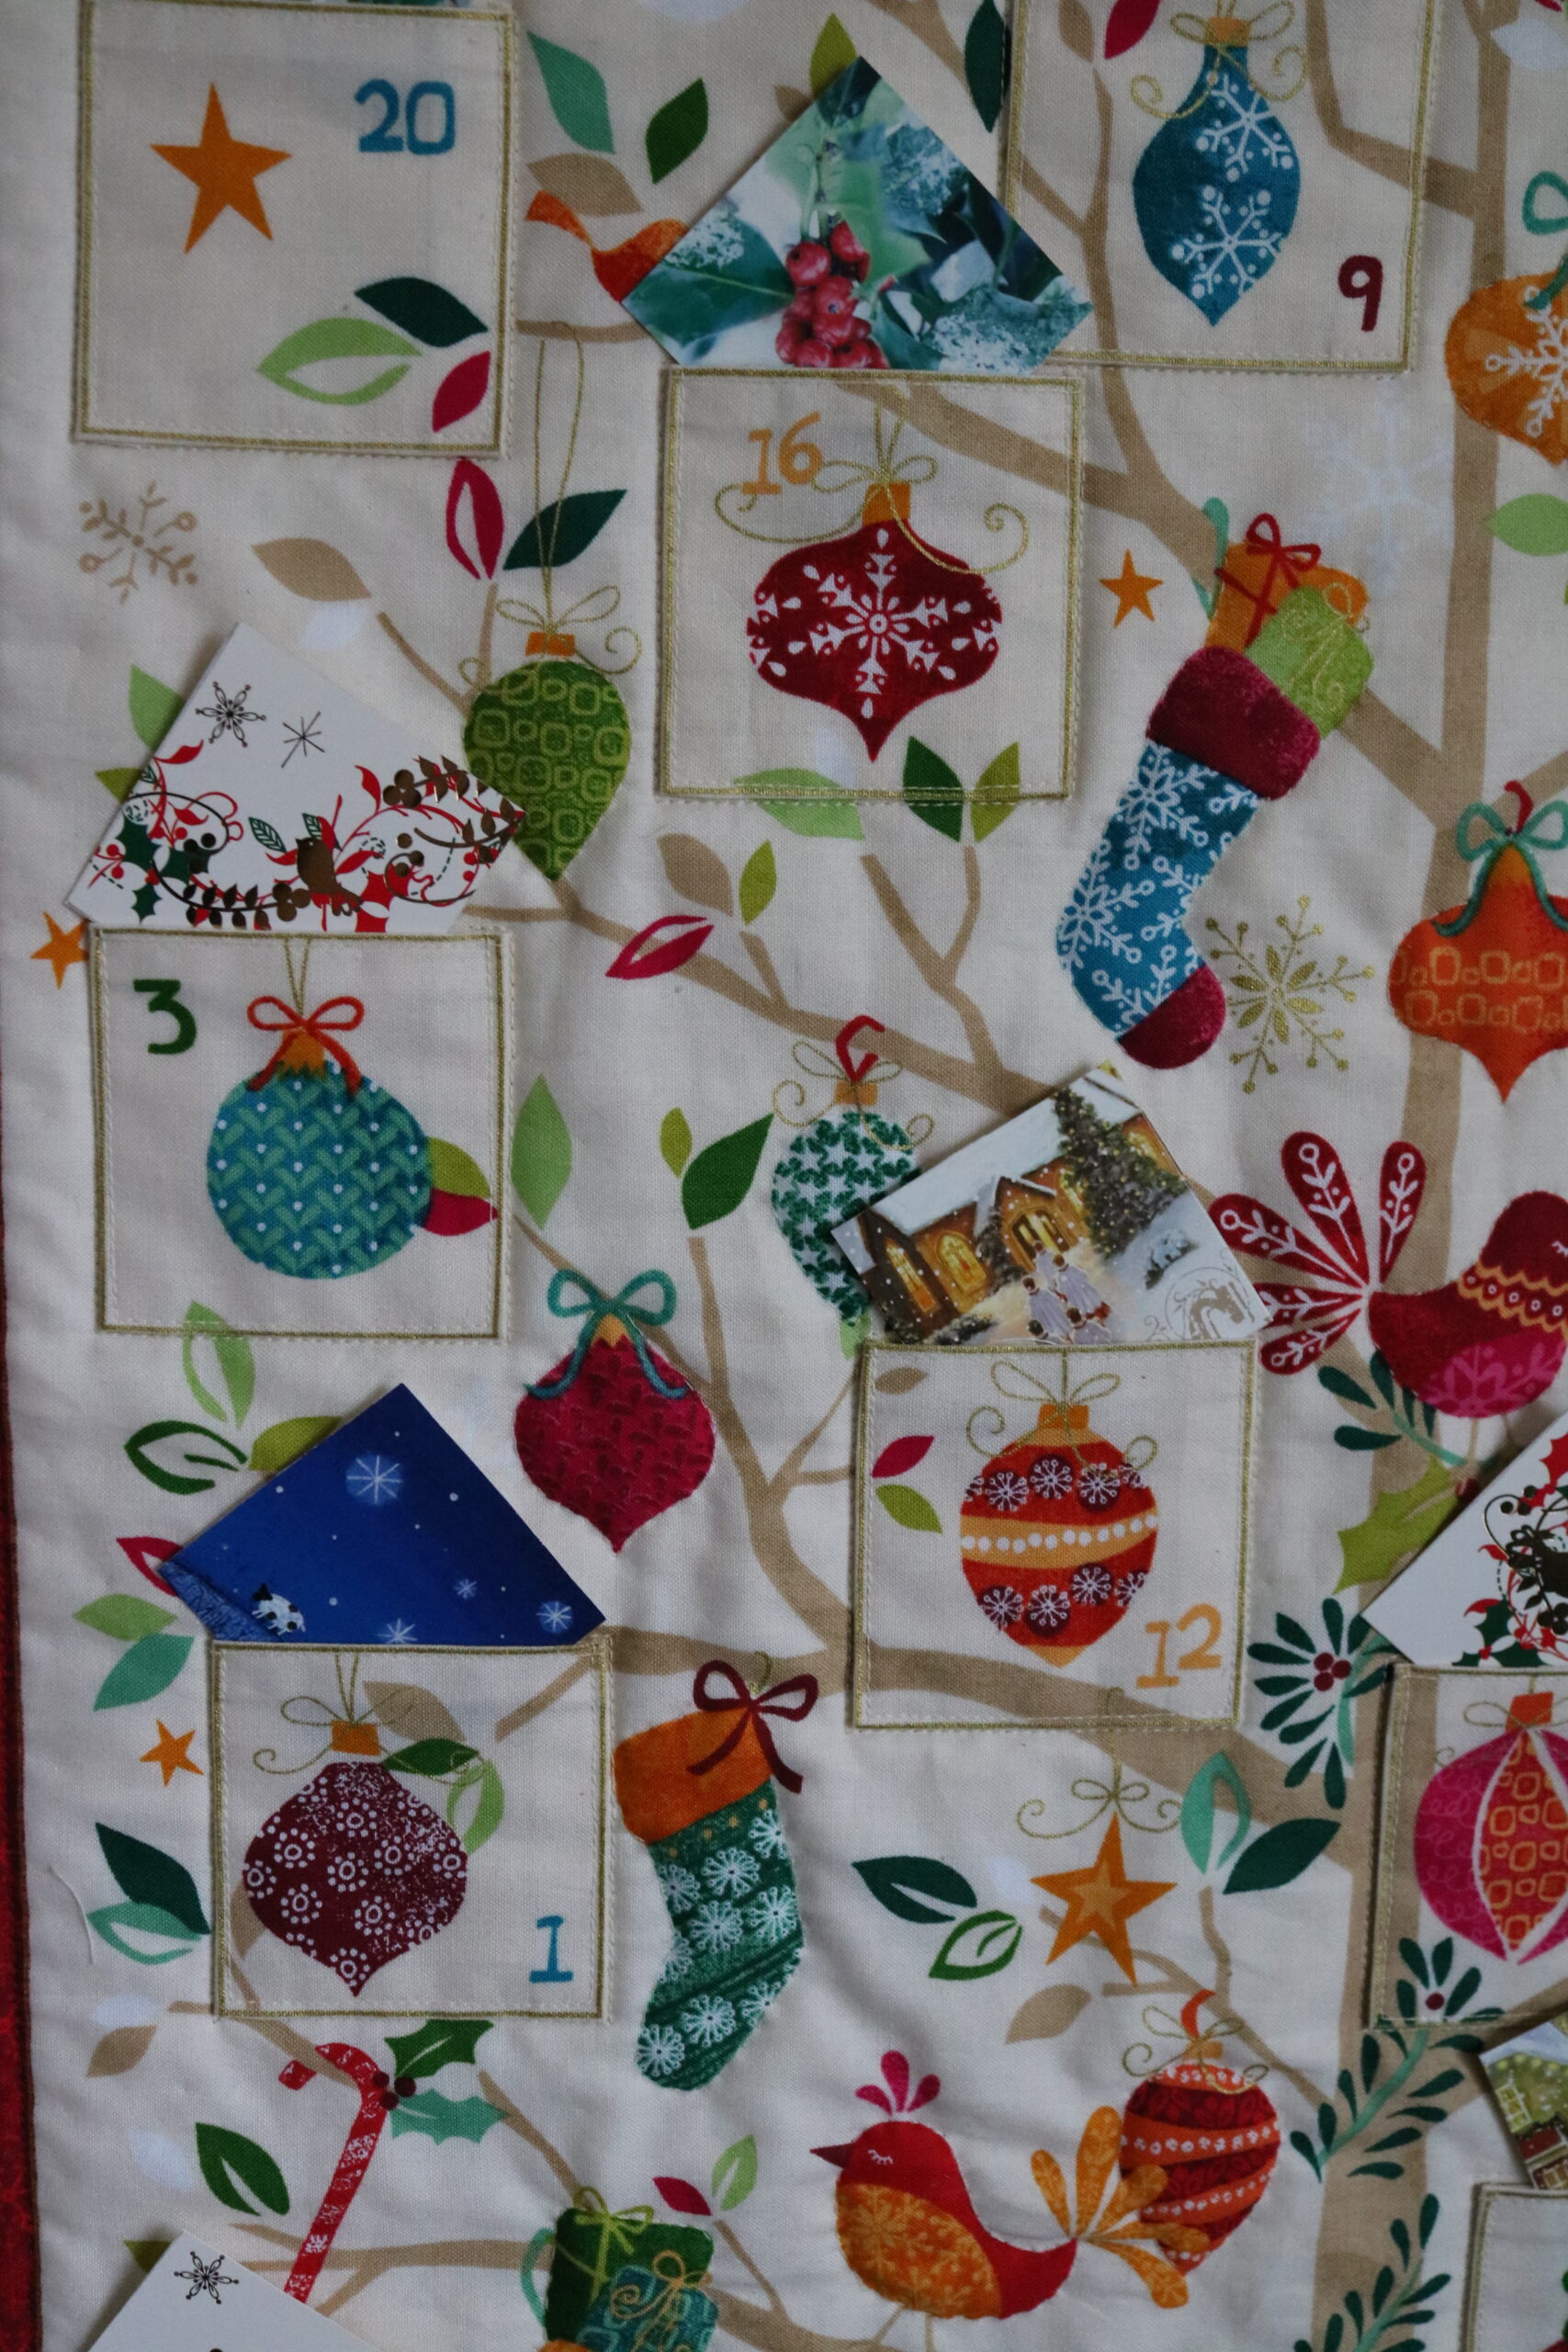
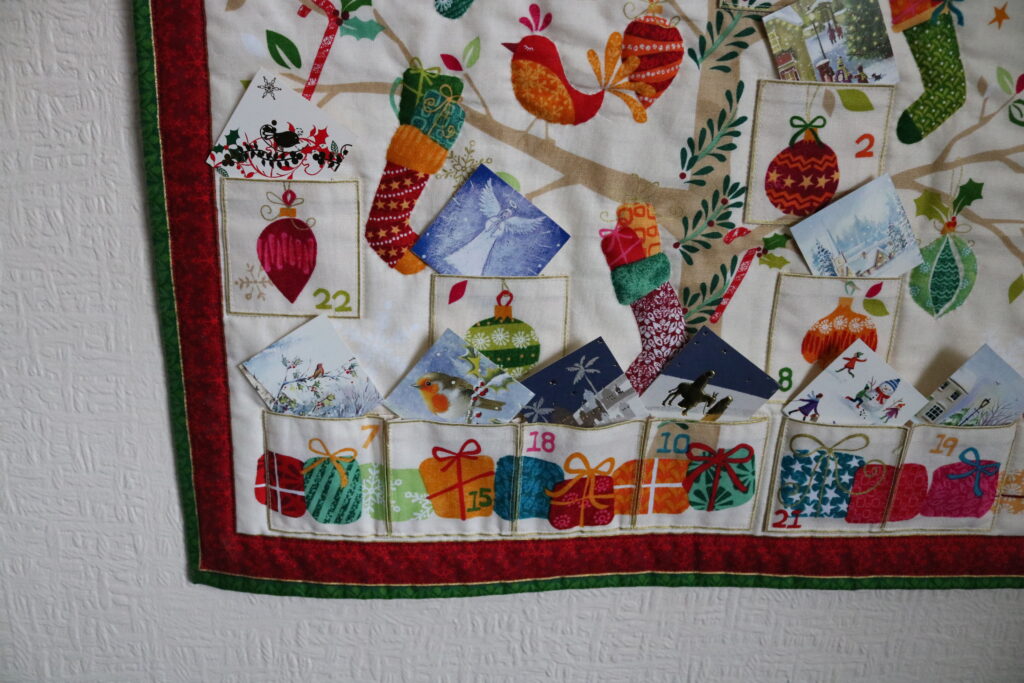
It’s just a panel, which has the printed background and a strip of pockets, which are to be cut out and applied to the same image on the background fabric.

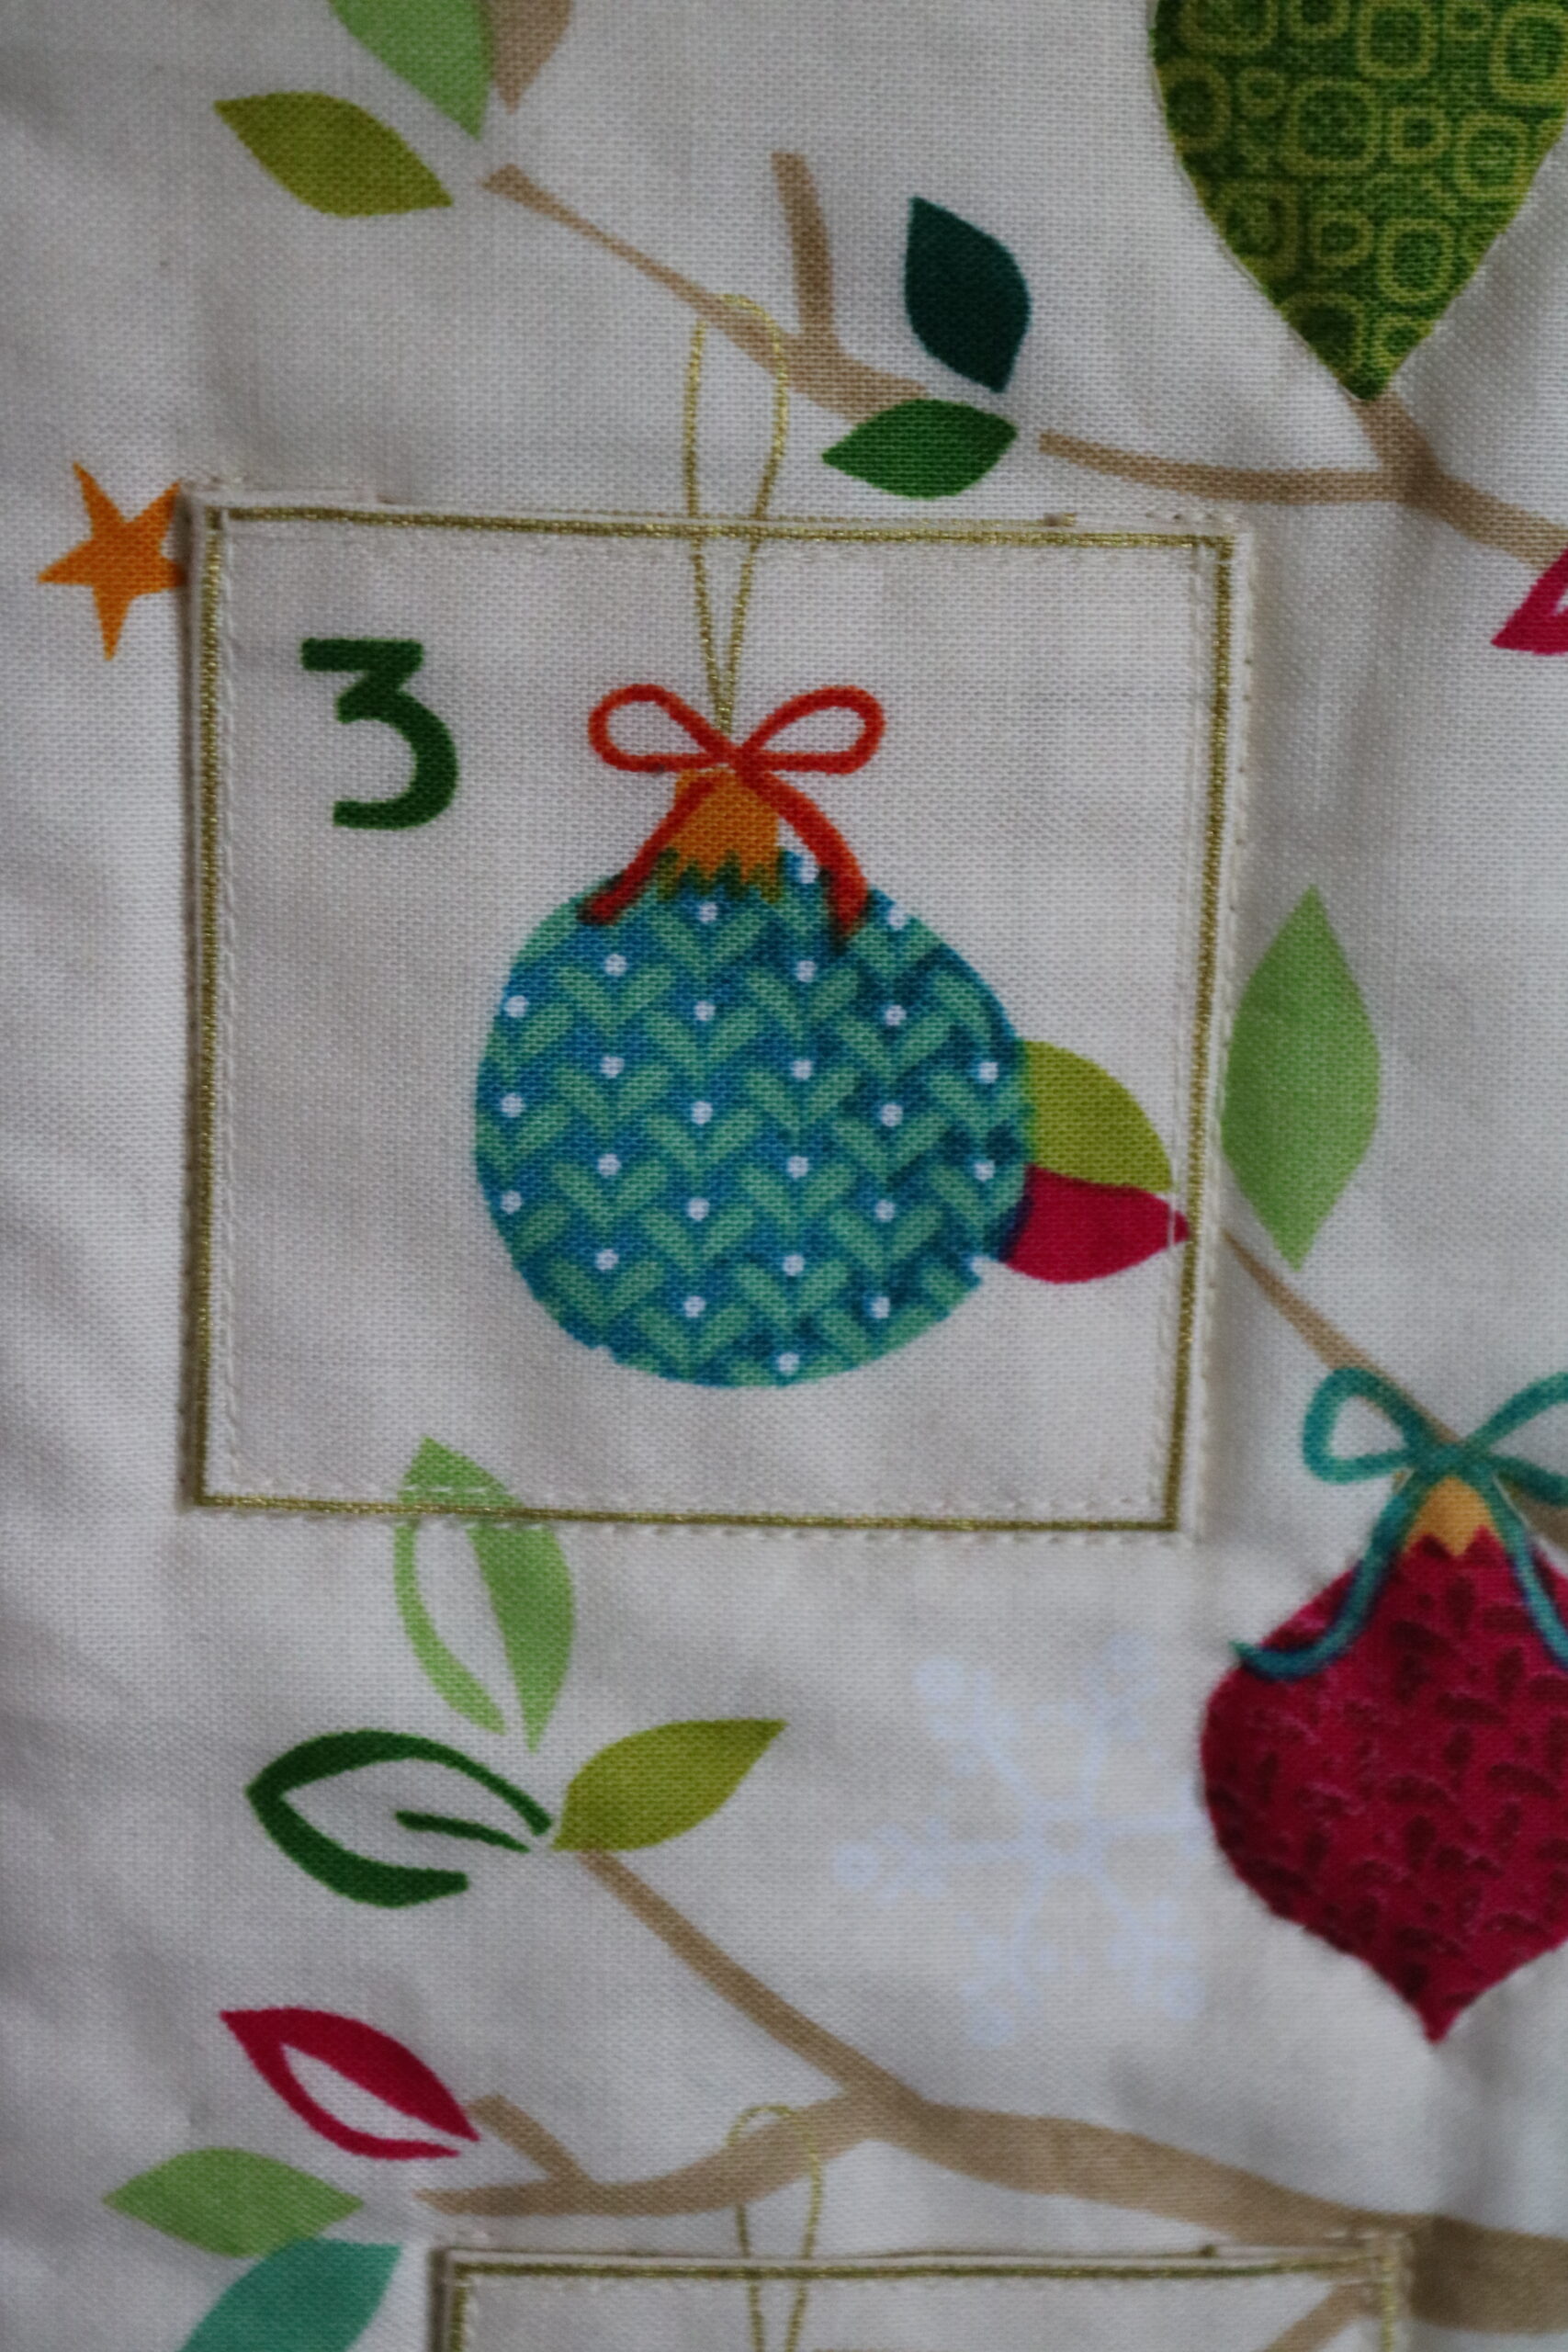
 Each pocket was cut, the raw edges turned and I tacked the edge down so that I could see the slim gold line at the edge. The plan was to topstitch the pockets onto the backing with a gold thread, but I didn’t like the effect, so I unpicked the ones I’d done and topstitched in a matching thread. 

 I also considered topstitching in various thread colours to match the colour of the pocket numbers, but that was beginning to look messy, that didn’t work either.

Once the pockets were sewn on, there needed to be more quilting to reduce the puffiness where the pocket were not placed.  I just picked out motifs in the same matching cream thread. Mostly these were hand stitched, because they were fiddly and in some cases too near the pockets for the machine foot to sew without pushing and pulling the fabric.

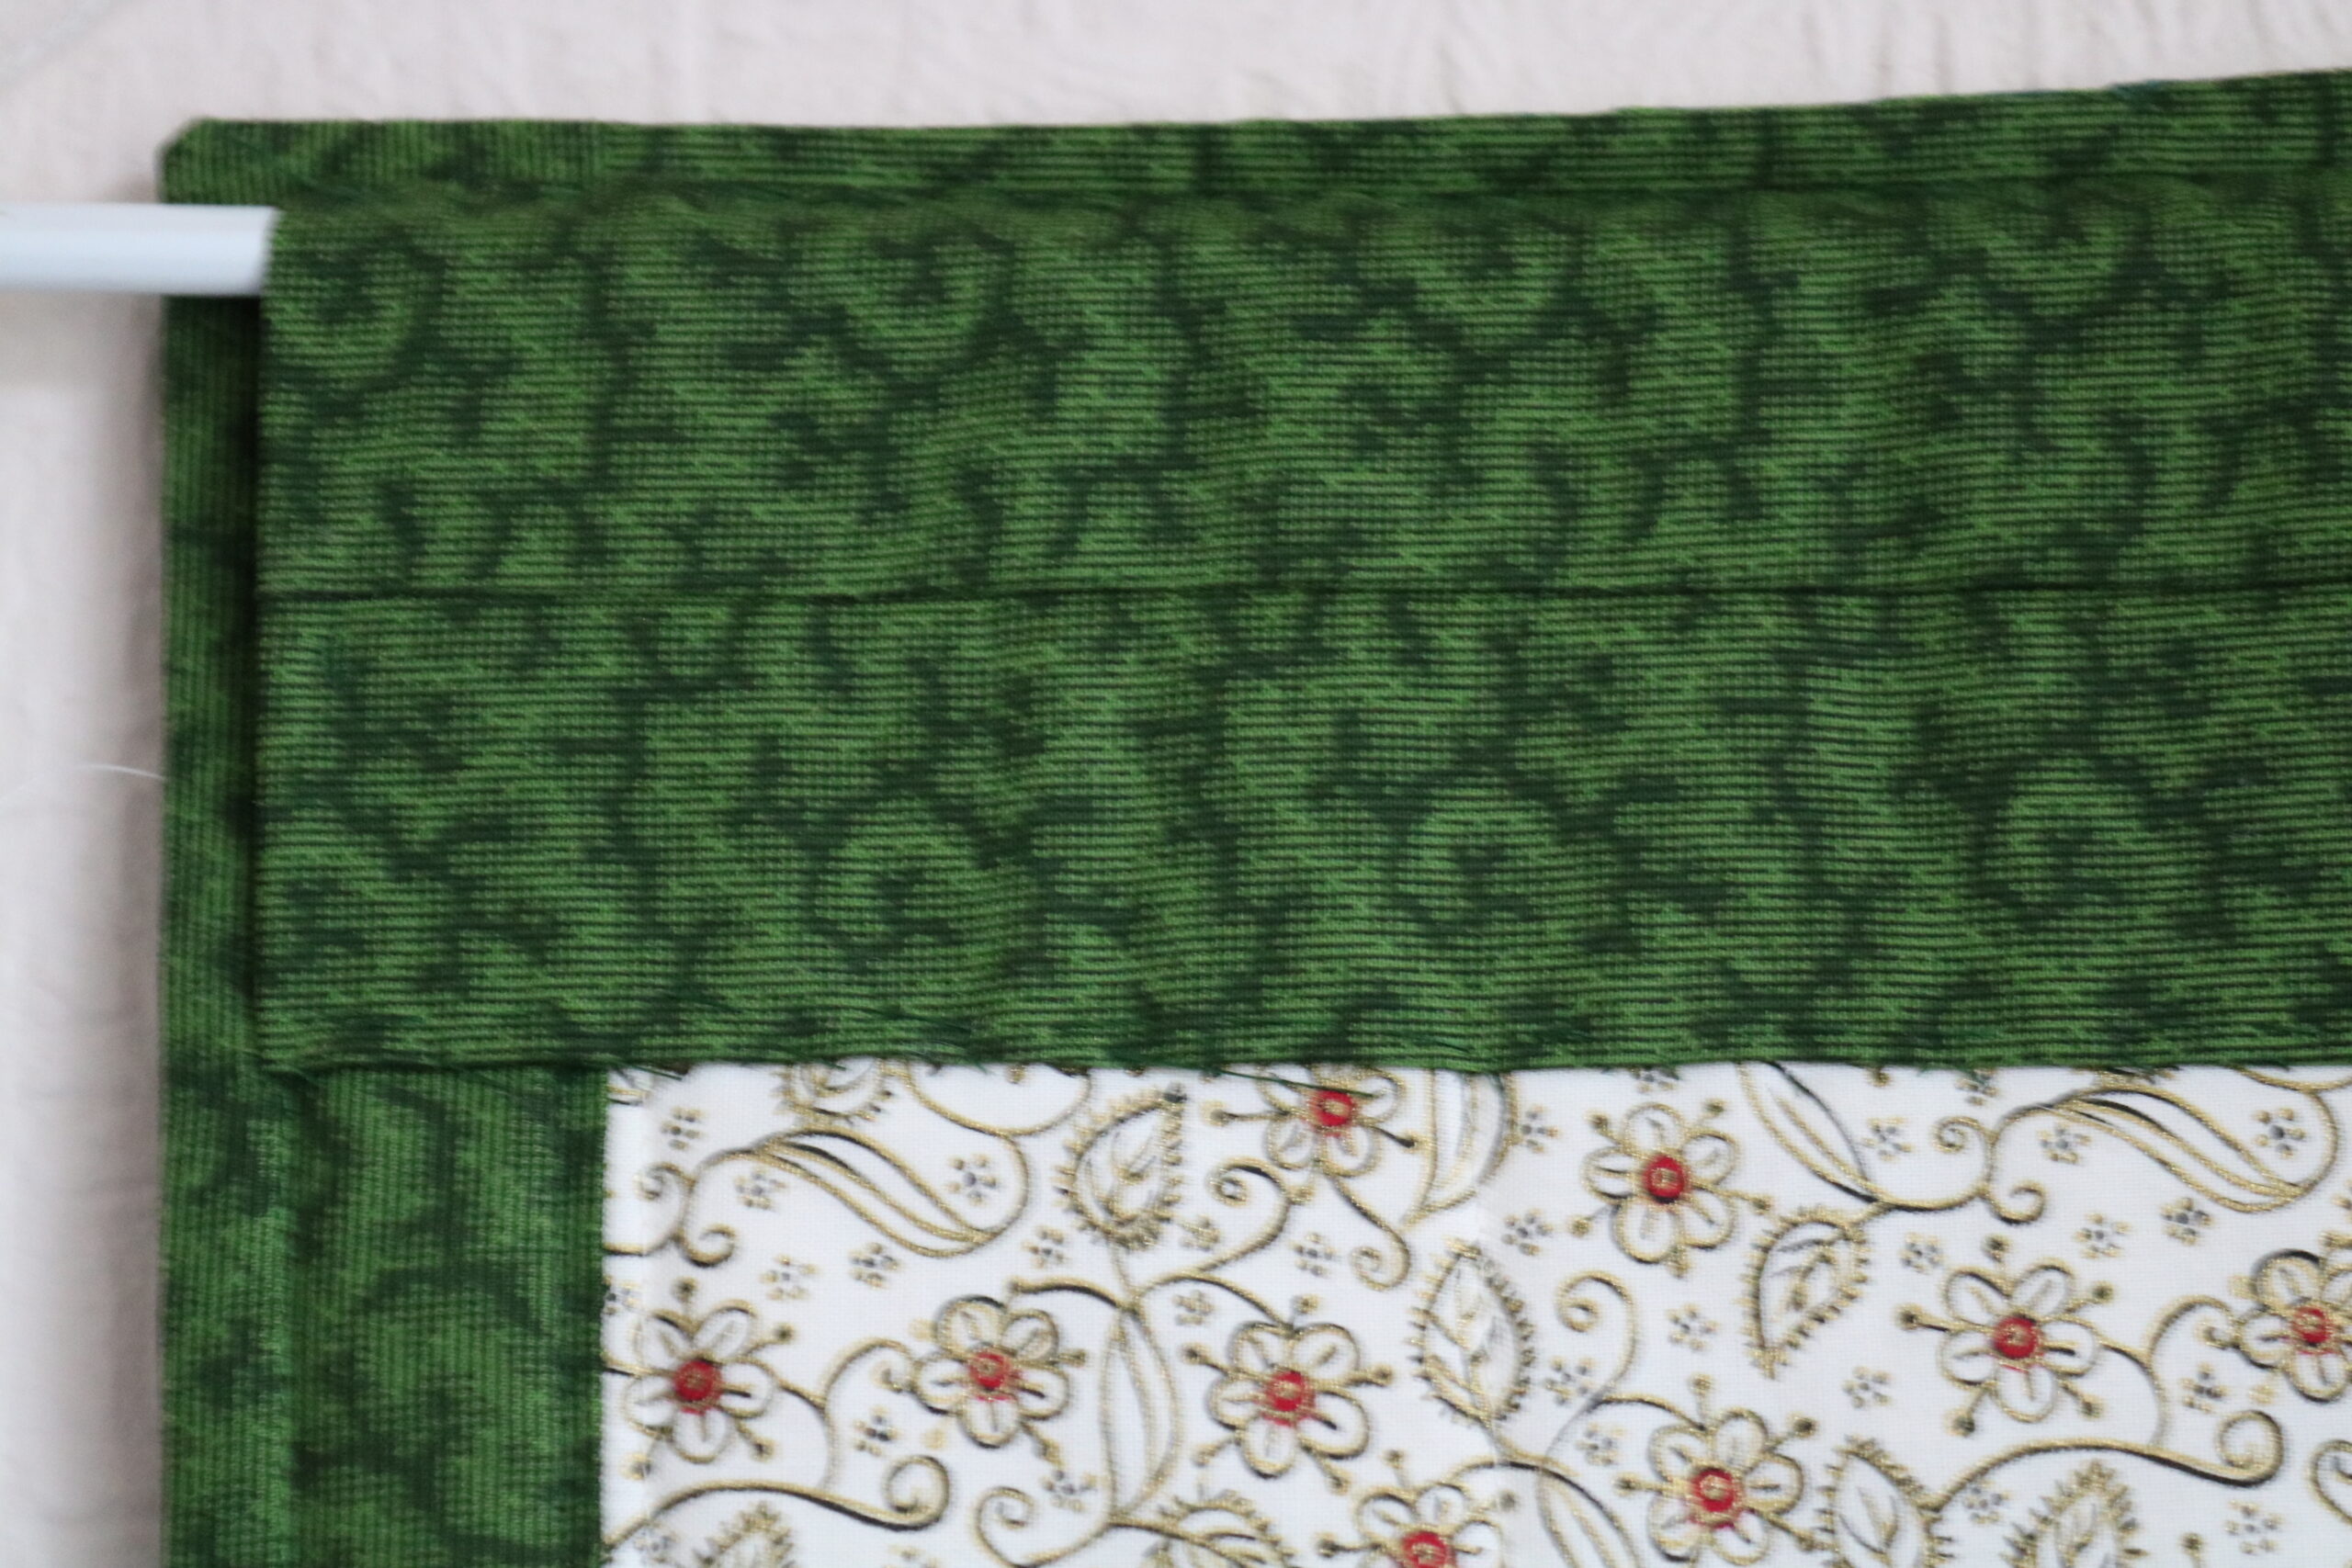
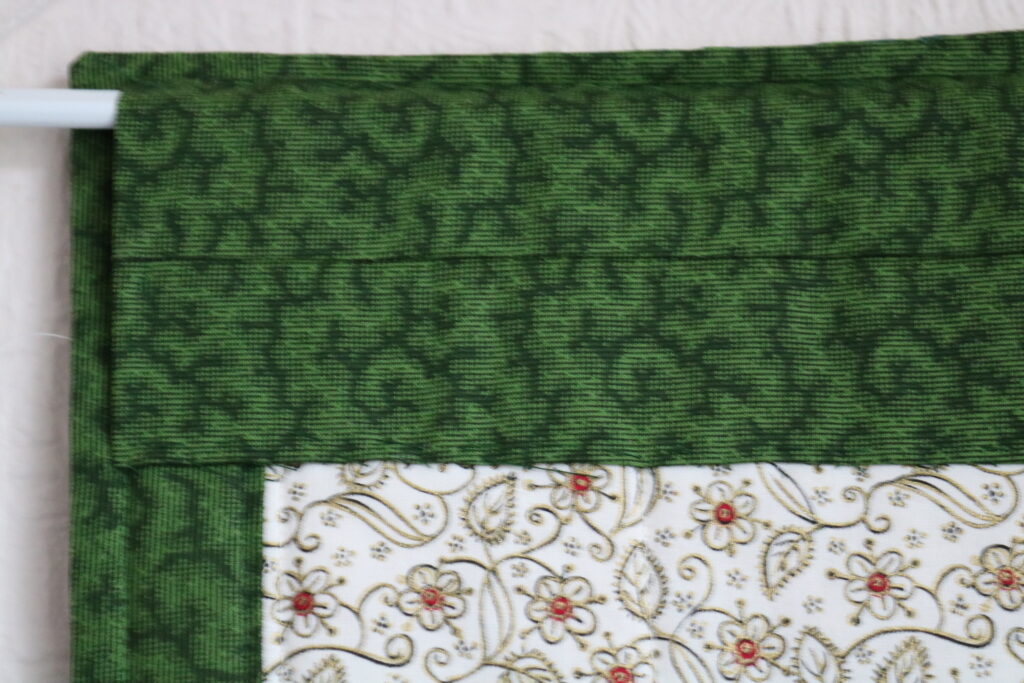
 I was determined not to buy any more fabric for this Advent Calendar project.  Seriously I have enough fabric to sink a ship. So I found a piece of ivory fabric with a gold and black motif in the Christmas box, which was not quite wide enough, and added green borders to make it fit the back. 

 The reason I chose green, (I’d rather have used red) was so that the edge at the front would match the edge on the back and any wobbliness or misalignment would be less apparent.  It worked and I’m happy with it. There was also enough of the green to make a hanging sleeve.
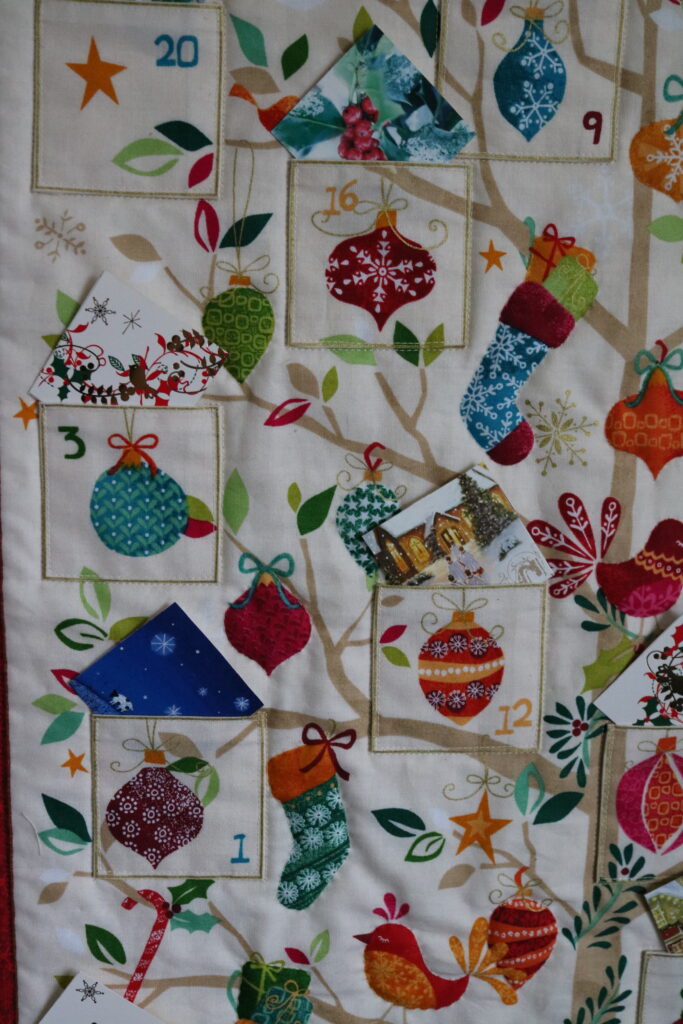
So the Advent Calendar was finished… well almost.  Traditionally, (I’m talking about my childhood in the 1960’s), Advent Calendars were a just paper, or card, the little windows had no chocolate or treats behind them, only a little picture and I remember the excitement of seeing what might be behind the little door each day.

 I didn’t want to just drop a sweet or wrapped chocolate in each pocket, I don’t need the calories anyway, and I couldn’t guarantee to have the self -discipline not to go chocolate rustling late at night, nor trust the beloved not to do so either. So what to put in the pockets?

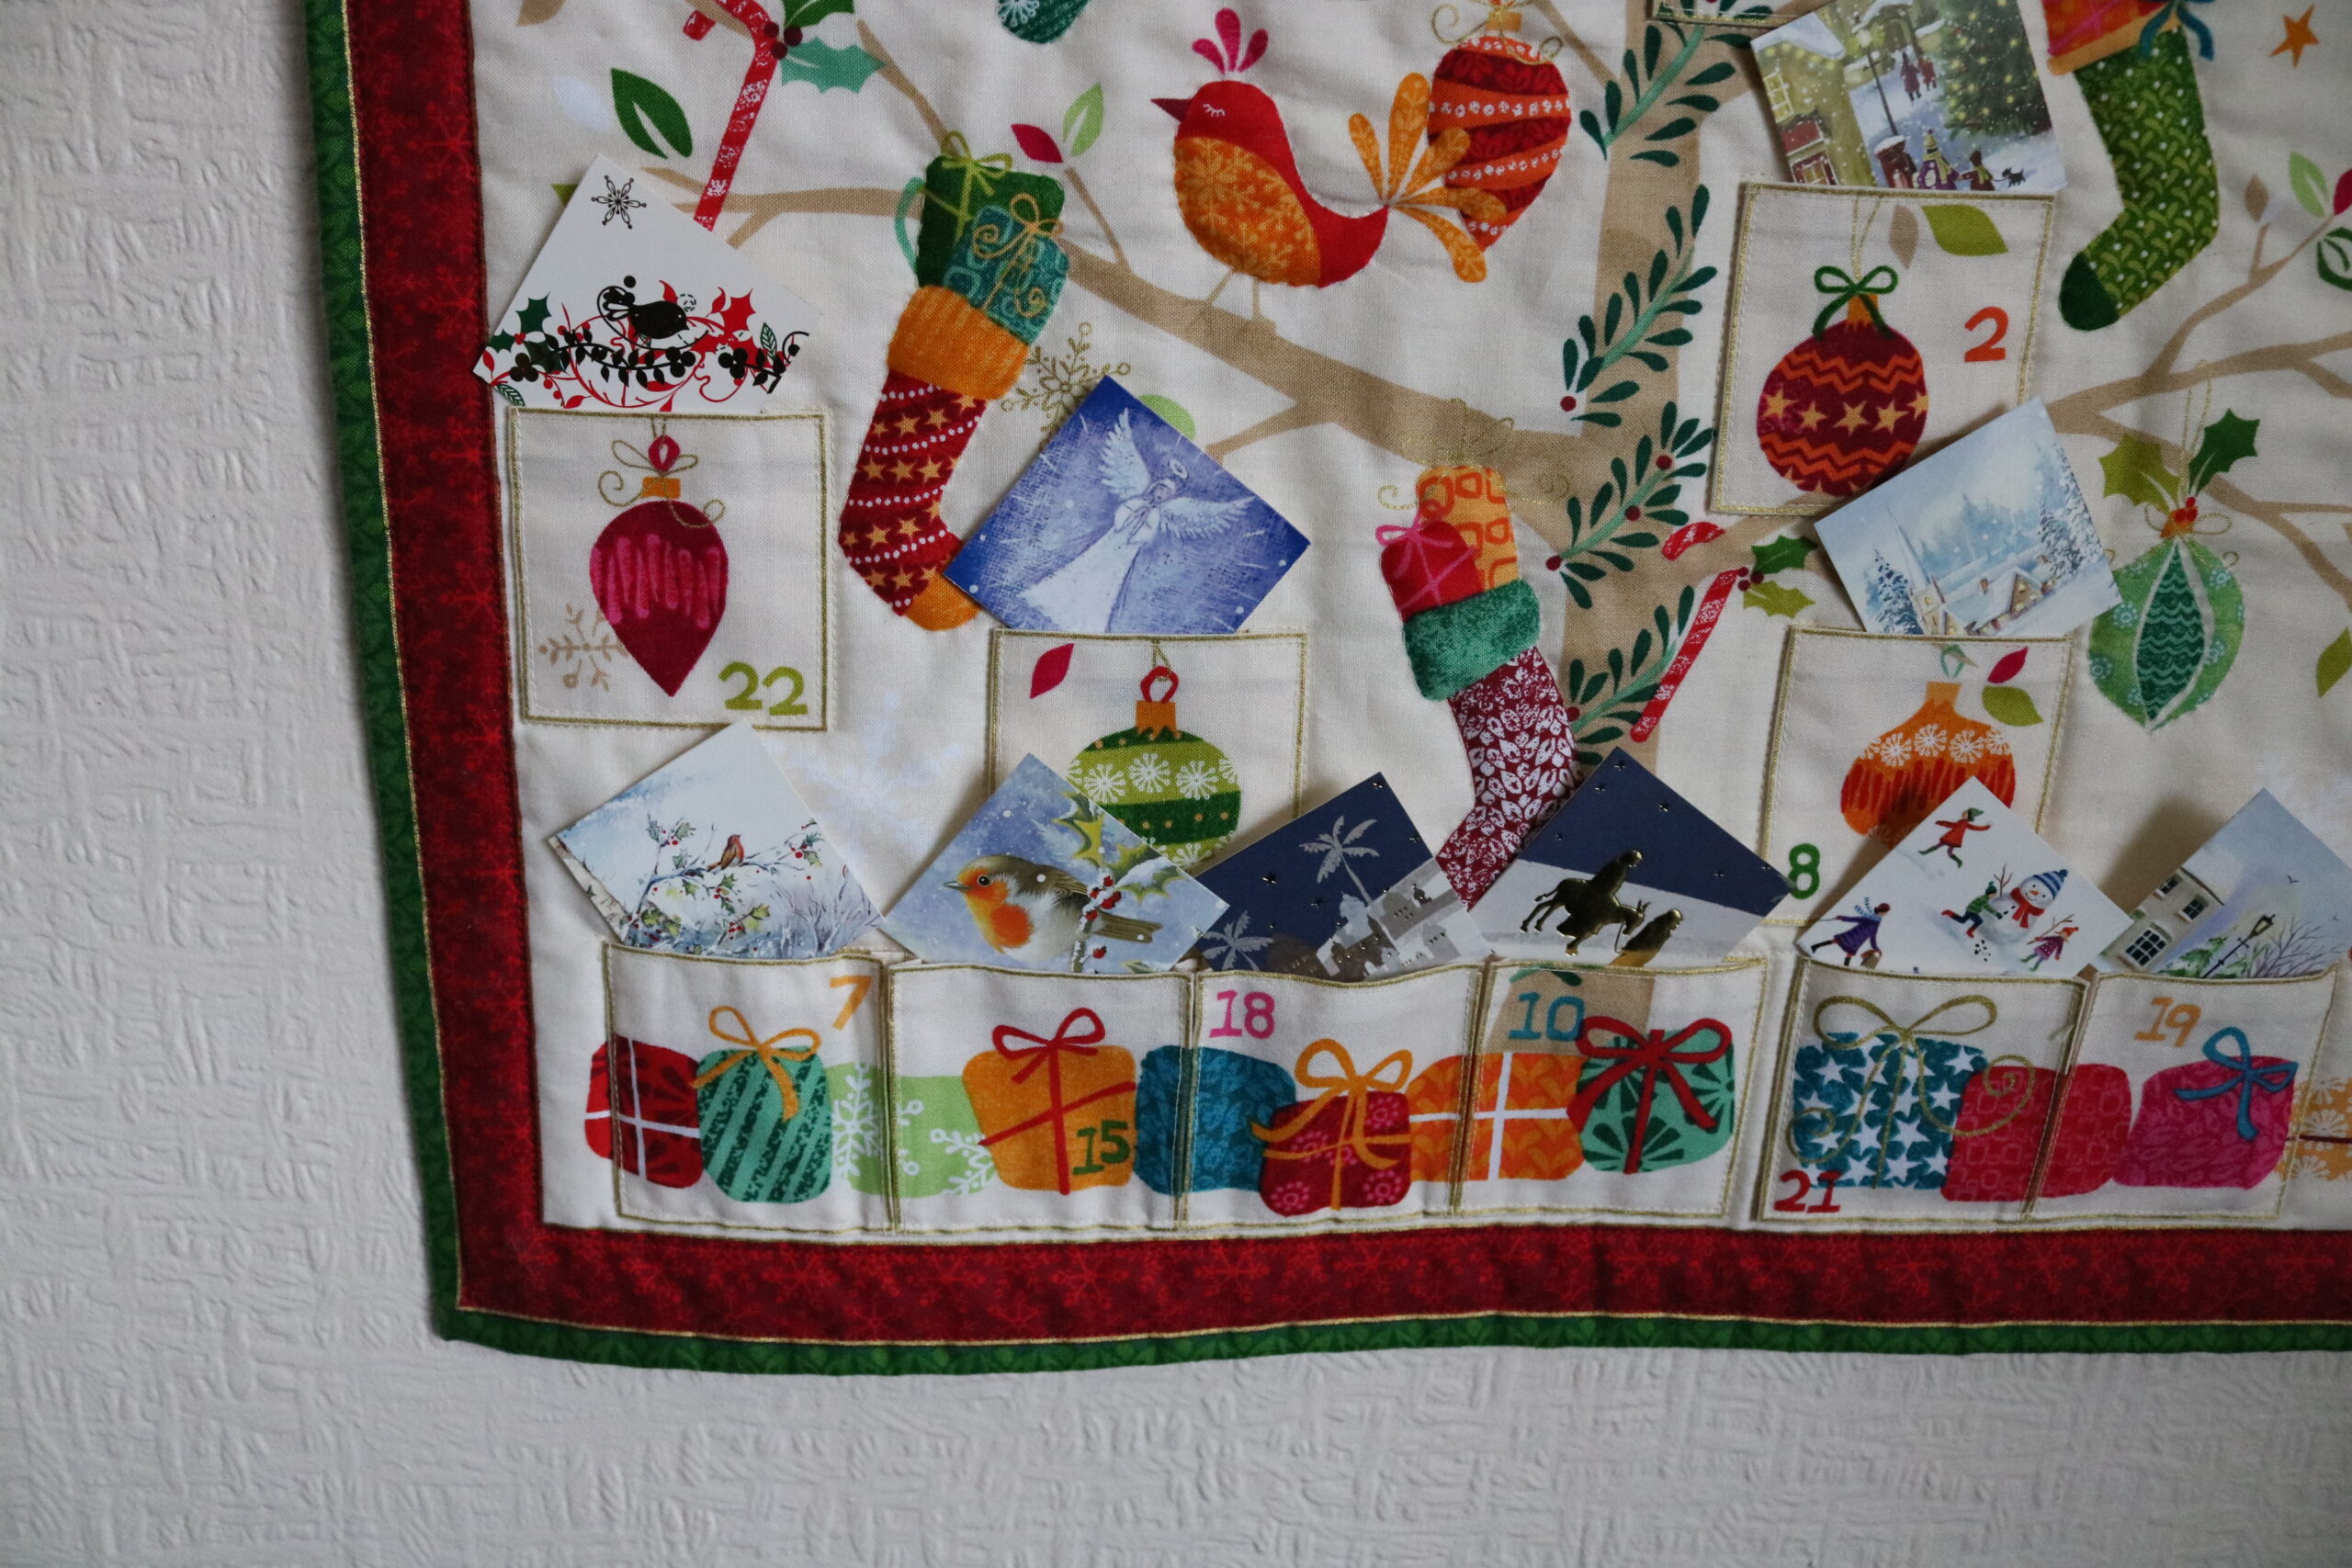
As I took down my Christmas cards at Epiphany I began thinking about those little pictures behind the doors on my childhood Advent Calendars.  Would an image on its own be enough?  I cut a number of cardboard squares, small enough to fit into the pockets, each with a Christmassy image, Robins seem to be well represented, but then I like Robins.

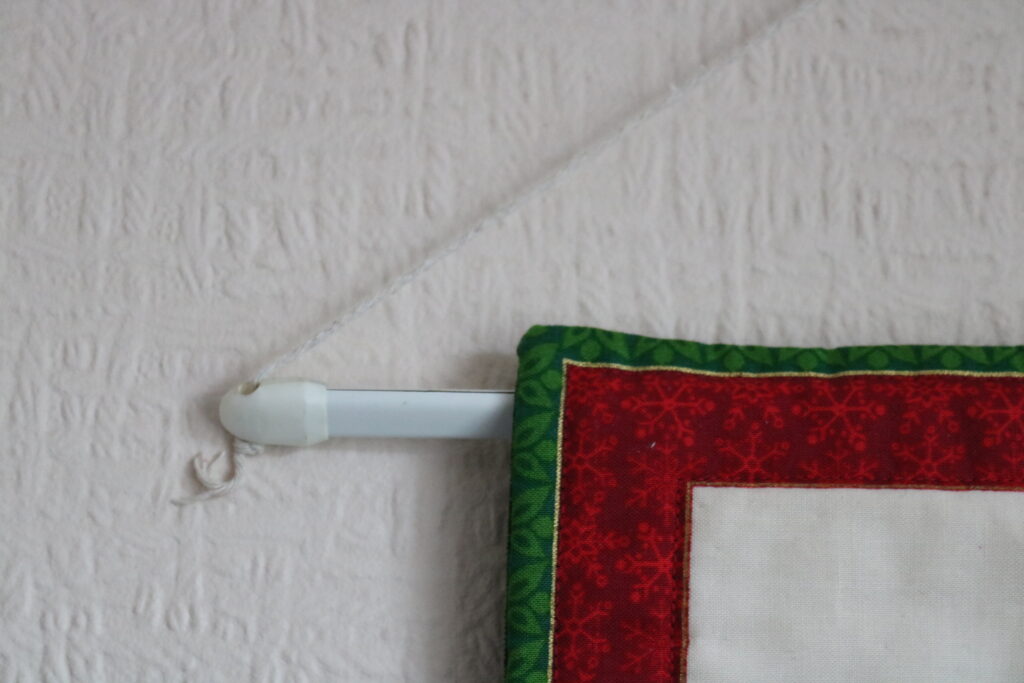
That’s where I left it, the Advent Calendar with a temporary hanging cane and a string to hang it by and the pockets full of little squares of Christmas card.

Last month I rooted out the Advent Calendar from its resting place and began thinking about how it should be finished.  I wanted a wellbeing theme, something positive to think about each day, something maybe to do for my wellbeing.  My Niece has an Advent Calendar, which she made from downloaded materials from Calm Moment you can find it here, (https://www.calmmoment.com/mindfulness/mindful-christmas-advent-calendar/ )

 I printed the 24 wellbeing suggestions from the Calm Moment Advent Calendar cut them approximately square and folded each one diagonally twice, tucking it into the pockets on the Advent Calendar. I also searched Pinterest for Christmassy quotes, printed those very small and glued one to each of my little squares of Christmas card.

 Through Advent I will have a Christmas affirming quote and a wellbeing suggestion for every day and not a calorie in sight.

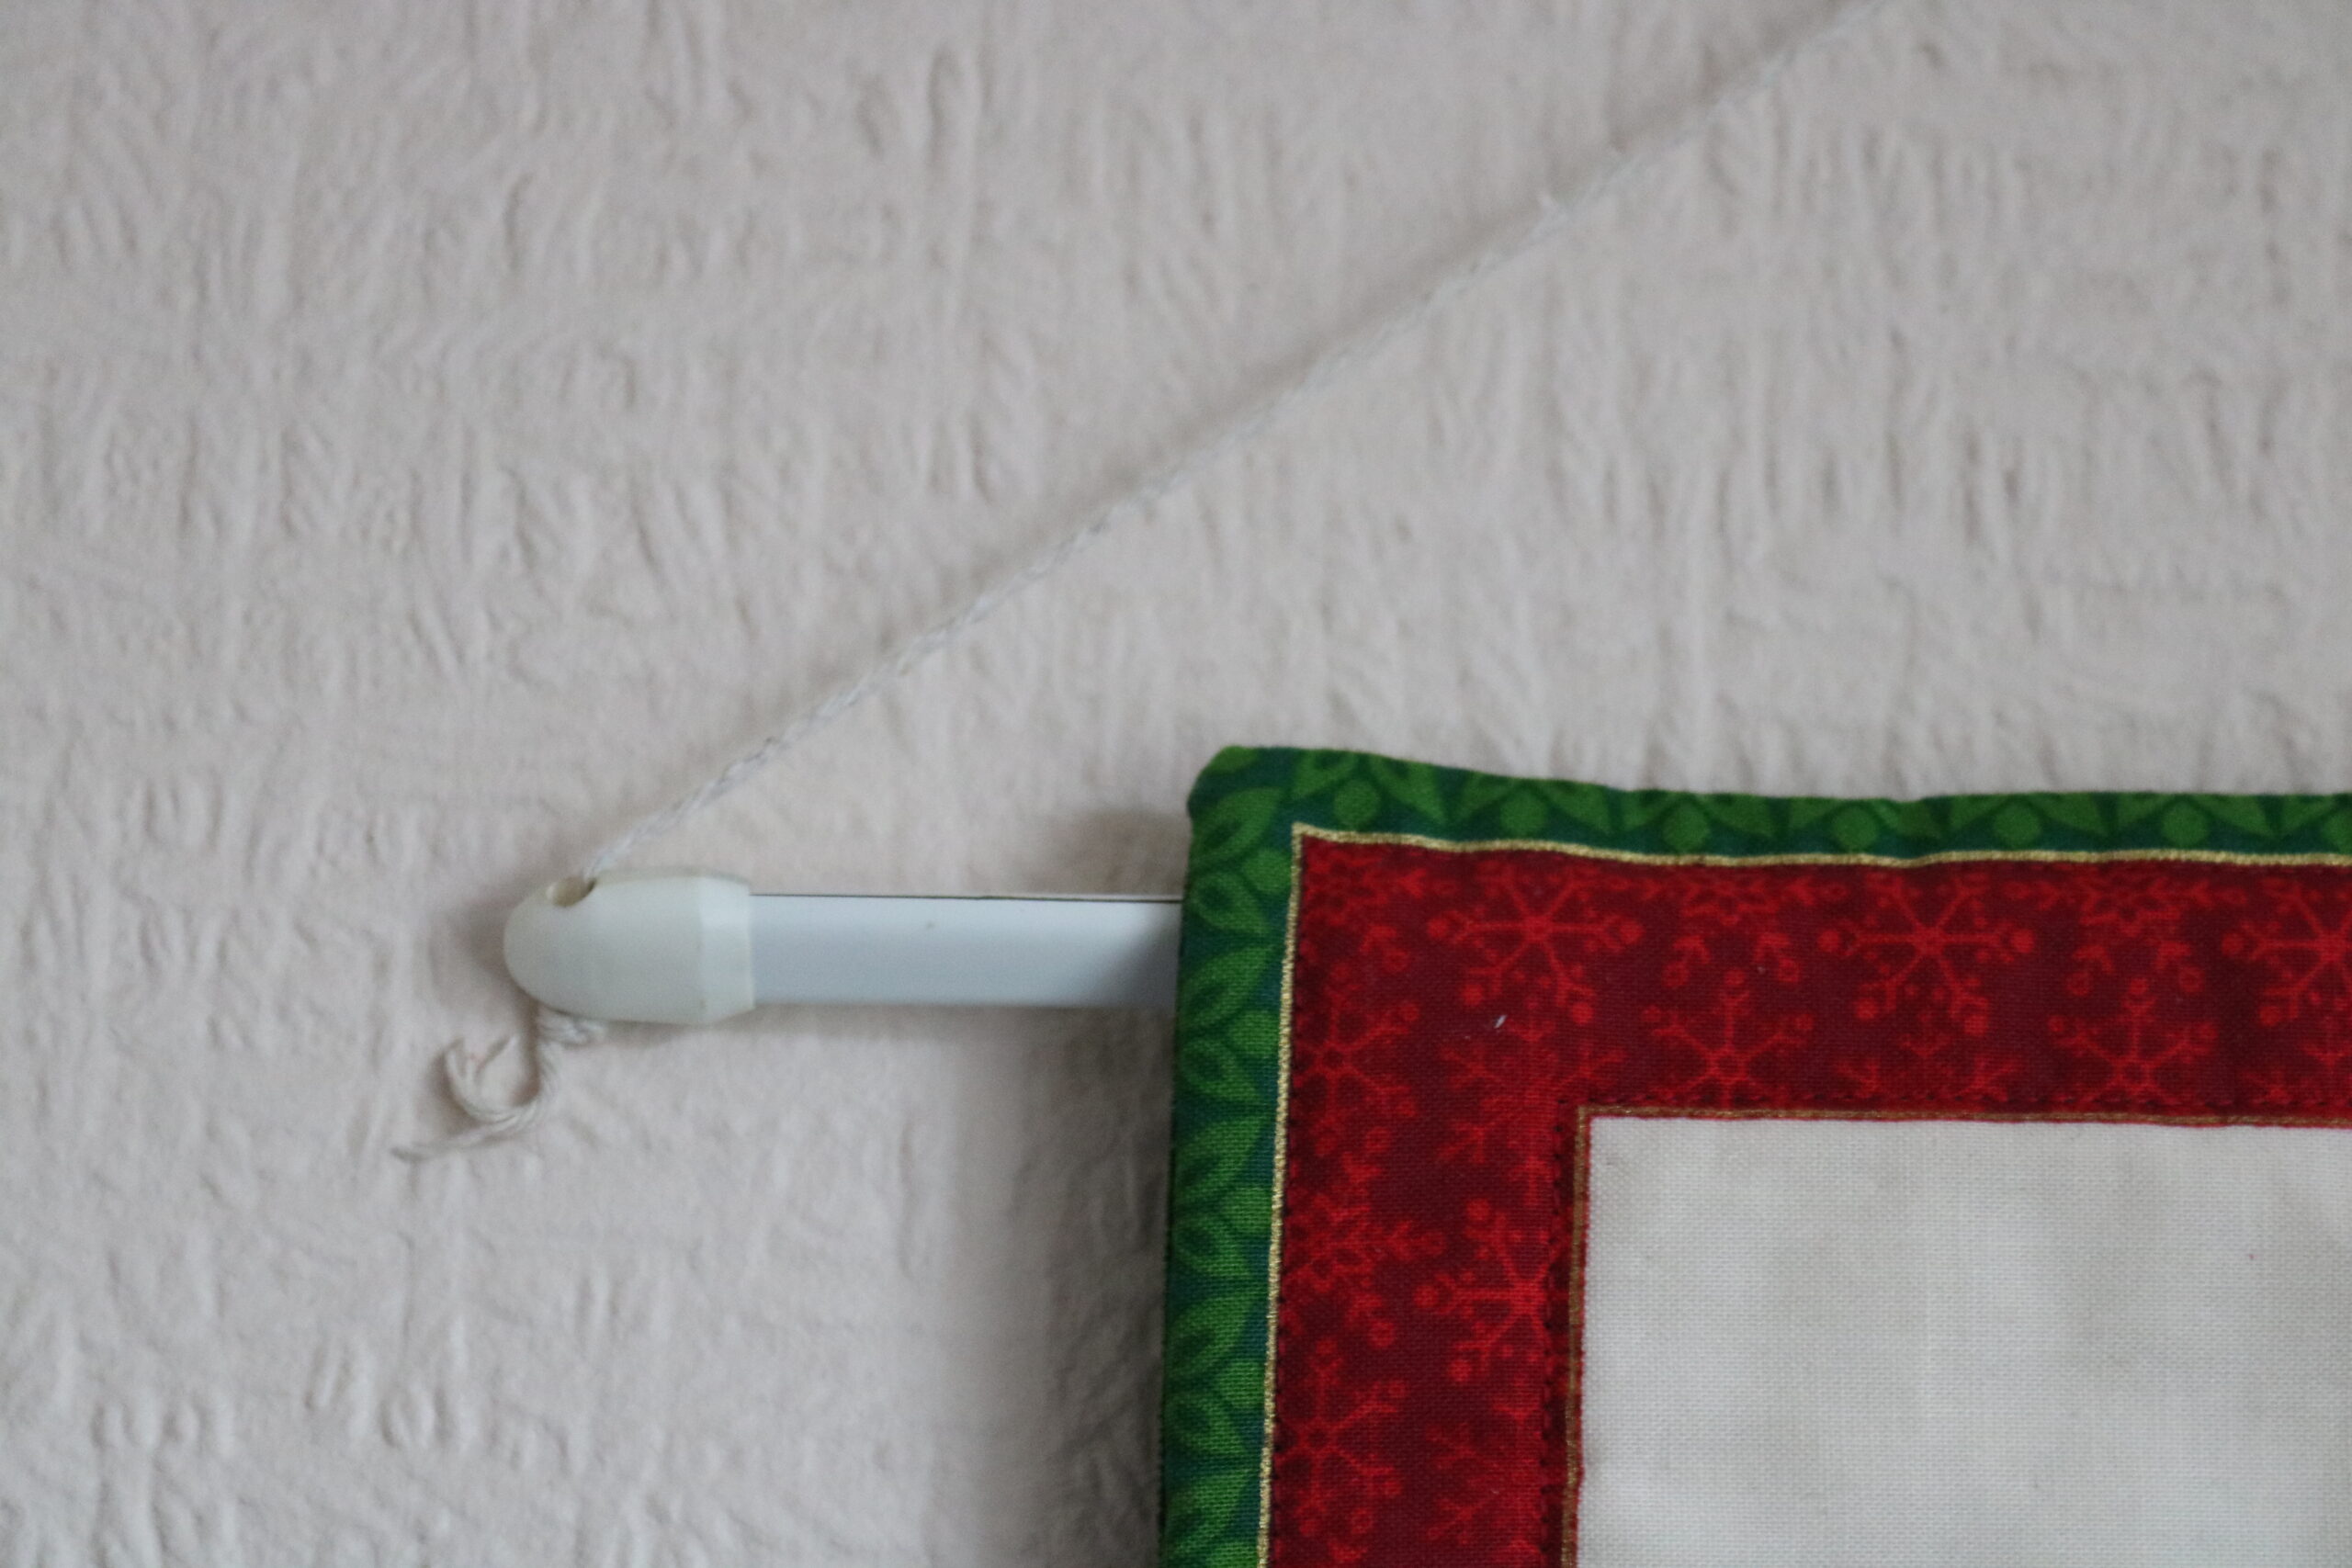
The only thing is… The hanging arrangements still don’t work for me, I need a metre or so of gold cord, and a stick  (with knobs on,) that I can paint gold., and tie the gold cord to. Inevitably even with my best efforts, it wasn’t ready in time for Advent. Shoot me! I’m still working full time and looking after my old Ma, and we have to keep a sense of proportion.  I’ll go into town on Saturday and buy gold cord, the stick I have, knobs are on order, (wooden beads actually) and all will be complete before Advent is over, honestly!  

A challenging challenge

I like the curvy line quilting because it’s easy to do and does not rely on the accuracy of the piecing, in fact if your piecing is not accurate curvy line quilting is very forgiving. That’s always a good thing.

What do you do if you don’t like the challenge block? Hide it.

Cecily's favourite churn dash block

This Lap quilt is made using the Churn Dash block (or monkey wrench), I think it was the favourite block of our most venerated late member and the instigator of our quilt group’s challenge, Cecily. But I dislike it. I wanted to rise to the challenge as always but I find the block rather pedestrian, perhaps because I’ve only made it in co-ordinated colours and plain fabrics, so a decided to do it in heavily patterned fabrics and mix it up so that the pattern was lost and the fabric became the star of the piece rather than the block.
Good idea, but I think I took it too far, the pattern is completely lost and with it the sense of rhythm to the quilt top, as a consequence what stands out are the pale squares, rather than the fabric in general. All of the fabrics are Liberty scraps from the printer’s factory shop, I’m so lucky to live nearby; I call in occasionally to buy craft packs, but I can also buy off the roll if I have a big project in mind.

Detail of quilting on Churn Dash quilt

In other senses I’m happy with the quilt; it hangs beautifully flat and straight and is evenly quilted throughout. I created my own wavy line quilt guide using taped together strips of cereal packet, with a hand drawn wavy line. On one side the wavy edge has wide and fairly flat curves, on the other side they are closer together and therefore appear deeper. I used the flatter side, drew on the lines with an air dispersible pen, and chalk pencil taking the quilt pattern right out in a continuous line to the edge of the quilt.
I like the curvy line quilting because it’s easy to do and does not rely on the accuracy of the piecing, in fact if your piecing is not accurate curvy line quilting is very forgiving. That’s always a good thing.

Pyramids Quilt

I took the pattern and volunteered to give it a trial run, to see if it would work as a group quilt

My quilt group have an exhibition biennially; we use it as an opportunity to raise money for charity and like to choose a small local charity rather than a large national charity. We don’t raise much but a little often goes a long way for a small charity, and makes a real and tangible difference. We always create a group quilt to raffle and to publicise the forthcoming exhibition.

This design was presented as a possible group project to create a quilt to raffle, as a member of the committee at the time I took the pattern and volunteered to give it a trial run, to see if it would work as a group quilt. There is one simple piece to cut, and to achieve an optical illusion similar to the tumbling blocks design, it’s necessary to chose fabrics in light, dark and medium tones, one of each tone is then sewn together to produce a triangle; placing the light, dark and medium in the same position in each block to give the effect of a pyramid viewed from above.It’s important always to have the three tones in the same position because the 3D effect of the pyramids only works if the light appears to be coming from the same angle across the whole surface of the quilt.

Although the triangles are put together in rows one pattern which also emerges is the hexagon; it was the hexagon I used as inspiration for my quilting design, as can be seen where it extends into the border.The design never made it as a group quilt, there were just too many possible variables, group quilts work best when the variables are kept to a minimum, this pattern required hand drawing of pieces round templates, cutting with scissors not rotary cutting, there would be fabric placement variables, seam allowance variables….. etc… etc. No there were just too many possible ways in which blocks made by many individuals would fail to go together neatly to produce a quality finished article.

Nevertheless I liked the finished article, so much so I began to make another quilt, from the same design but with a limited palette of just three fabrics, but somehow, somewhere I lost the template, and the impetus to finish, so for years I had a number of cut pieces and a bag of bits, but no template. The original pattern came from an Australian Quilt magazine, which didn’t belong to me, and I’m not sure who owns it. I have subsequently found another template for the same design in a quilting book I bought in (of all places) ALDI. Maybe I’ll get round to finishing that quilt, or maybe not, the thing is … the moment has passed.

Thought Stalking

Have you ever been stalked by a thought, or an image, or a half formed plan?

Have you ever been stalked by a thought, or an image, or a half formed plan? Some months ago I saw a block of a yacht and had a half-cocked idea for a quilt but the block itself didn’t really do it for me, it had no sense of movement and wasn’t very yacht-like, so the idea didn’t progress further than that initial “hmmmm” moment.

However since then I have been stalked by images of yacht’s, not just the real thing at sea or on lakes but wherever I go, in stained glass, in shop windows, in magazines or on fabric, toy pond yachts on window sills in houses I pass (not one but several in a single week), postcards, even in a bag of Haribo sweets, and a shower curtain.

Am I being stalked or are Yacht’s simply ‘on trend’ at the moment, either way I think I need to work out my thoughts in fabric. What is a Yacht without billowing sails, a floating gin palace; a glorified floating caravan? My Yachts must have wind in their sails, and movement in the block, I don’t want the quilt to represent a flat calm, but I’d rather have a brisk breezy day than stormy weather.

In only half an hour

I now have a mini bin to sit on the corner of my work bench, in which to drop all those snips and threads, and it only took half an hour to complete start to finish.

My Dearest often complains about stray threads on the carpet, and I have to admit that when sewing I tend to put threads in a little heap on the nearest surface meaning to sweep them into the bin later. My threads and fabric trimmings have a tendency to creep and float, catch a lift on clothes and end up anywhere but where I put them. I’ve been meaning to find a suitable bin to put wherever I sit to sew and recently came up with a solution.

This is something I think a saw in a magazine years ago, long before Pinterest , maybe even before I had a PC, I have no idea who to credit with the original idea.


I recently emptied this container for in-wash stain remover, but it could just as easily have contained mini flapjack or millionaire’s shortbread. I rubbed the surface over with a wire scouring pad to roughen the surface, and spread the surface with PVA glue, using a finger.

Then I used fabric scraps cut with pinking shears which have been sitting in a drawer for years since mail order fabric buying relied on receiving actual samples through the post to choose from rather than choosing from virtual reality fabric in on line shops. I stuck each scrap on, slightly overlapping the one before, dabbing a little glue on the dry edge of the previous scrap to make sure the overlap stuck.
I now have a mini bin to sit on the corner of my work bench, in which to drop all those snips and threads, and it only took half an hour to complete start to finish, though probably years in the incubation of the thought.

Fibonacci and the Quilt Police

Points have to come to a point, seams need to meet where they are supposed to meet, and I will unpick and try again, once, even twice, but after that I will embrace imperfection and move on; life is too short, and only God is perfect.

Inspired by the wonderful work of Ricky Tims, based on the Mathematical theorem of Fibonacci, I was inspired to have a stab at one of Ricky’s quilts; the first attempt was for a gift, a cot quilt for a friend who was expecting her first child. I was so pleased with it when it was finished it, that I could hardly bear to part with it, but still, it was made for Eric, and so to Eric it was given. Eric now prefers aeroplanes, so it lives in his parent’s room, hanging on the wall. Can’t argue with that!


This is my second attempt, in Fossil Fern fabrics. I have to say with this particular design, accuracy is all. Many people will tell you they are not members of the Quilt Police and it’s OK if your points don’t meet. I am a paid up member of the Quilt Police, points have to come to a point, seams need to meet where they are supposed to meet, and I will unpick and try again, once, even twice, but after that I will embrace imperfection and move on; life is too short, and only God is perfect. I can be relaxed about points and joins in some Quilt patterns but if you are working to a pattern, inspired by a 13th Century mathematician, then surely to goodness, accuracy is absolutely the point. (Fibonacci’s 1202 book Liber Abaci introduced the Fibonacci sequence to Western European mathematics).


Look closely at my joins, I did my absolute best to make sure every point and join met as neatly as I could, mostly that was achieved by careful planning and pressing of seams to make sure every seam butted neatly with the next.
It looks very complex to achieve but actually, provided you give it your full and undivided attention, it’s very simple to make, take 4 equal size squares of fabric, stitch two together,then the other two and laying them side by side you simply cut each strip incrementally larger from the centre to the edge and then interleave the narrowest strip from one pair with the widest from the opposite edge of the other pair, and so on till the centre strips are of equal width, stitch together, press, turn by 90 degrees and do it again.

I do mean full and undivided attention, don’t have the TV on in the background, don’t be talking to a friend, don’t be singing along to the radio, and for goodness sake don’t be stewing about a row you’ve had, or some other cause for irritation, that way disaster lies. You need to be in a Zen like state of calm concentration when cutting each strip, as any mistake is very difficult to retrieve.
If you want better instructions, it’s a Ricky Tims’ quilt design, I recommend you check out his website (see below) and consider buying one of his books on the subject, where he gives excellent guidance and many more interesting projects.

click for Ricky Tims site.

There’s Plenty More

Each time I look at this quilt I see another fabric memory, not just of the individual garments they came from, but where we were and what we were doing when we wore them.

My Favourite Quilt

My Favourite quilt, the one I’m most proud of, the one which hasn’t yet been washed, and the one no-one is allowed to sit on, is called “There’s plenty more”.  I collected together scraps of almost every fabric in my stash and my mother’s, it even has a contribution from a friend, who began a dress and never finished it, back in the 1980’s.

I cut a simple triangle out of them, and then sorted them from lightest to darkest; in order to shade the quilt from dark in the centre to light at the edge, what represented “light” in the centre would be a “dark” at the edge. I made 4 columns of the cut triangles, from darkest in the 1st column to lightest in the 4th, then broadly speaking working from the centre of the Quilt to the edge I began matching the fabric in the first column to the fabric in the 3rd.  By the time I reached the edges the fabric in column 3 which had been used as ”light” now  represented “dark” .

so many happy memories

In the quilt is fabric from that favourite dress I wore when I was eight, (see “ There’s nothing new about recycling”), there are also fabrics from the 60’s , 70’s, 80’s, and 90’s, just looking at the centre, I can see the remnants of clothing  worn by myself, my sister, my mother and my niece, there are Liberty fabrics, a blouse here, a pair of Capri pants there, Laura Ashley dresses, patchwork packs once sold in the shops, when Laura Ashley was still alive and encouraging hand -made crafts. My Niece’s little baby dresses, shorts I made for her to match my own. Each time I look at this quilt I see another fabric memory, not just of the individual garments they came from, but where we were and what we were doing when we wore them.

Does that mean I need to go scuba diving?

“Who’s Cherry?” not that I’m jealous at all, just curious.

13.10.2012
Having been woken for a cuddle by the 12 year old, who had subsequently departed to play shoot ‘em up video games on his PC, I was lying awake this morning listening to my Dearest snore when suddenly he spoke. I always know when he is dreaming about work because he speaks in a loud authoritative voice which I think of as his Boardroom Voice, “Cherry, does that mean I need to go scuba diving to collect it?” it’s not often one enjoys a good belly laugh in bed but I roared with laughter, imagining my beloved in a wet suit was enough to make me laugh out loud.
I nudged him awake with a sharp elbow to the ribs, saying “you don’t need to go scuba diving Love…… And who’s Cherry?” He rolled over and smiled, I got a cuddle but no answer, “Who’s Cherry?” not that I’m jealous at all, just curious. “Gerry” he replied finally, “I was talking to my Boss Gerry, I was driving up the motorway in the Volvo” (we don’t have a Volvo, sadly) ” when I hit a shopping trolley and crashed the car, a lorry came to collect the wreck, but a man was throwing bits of the Volvo into the River Ribble” explain that if you can!


We used to have a Volvo, I loved that car


Plaid Star Quilt

it is soft and cuddly from washing and use, a little tatty and ragged in places

This quilt is a group effort in that it was a “block of the month” challenge of my local quilt group. Each month a block pattern is given to group members with palette and fabric type instructions. At the following month’s meeting members contribute one or more blocks each with their name pinned to it. The names are put in a hat and a name drawn out, the winner gets the blocks. It is a good way of keeping your hand in and trying a block pattern without being obliged to make an entire quilt. If you don’t fancy winning the blocks, don’t put in a block, or don’t put your name on it. If you do want to win contribute more blocks to increase your odds.

still looking good


I won this set of blocks 13 years ago, and made it up for my nephew; he was 6 then and as you can see very pleased with his quilt.

It’s a well loved quilt, by which I mean it is soft and cuddly from washing and use, a little tatty and ragged in places, and I have done a couple of repairs while I had it back from him to photograph . Nevertheless it’s still looking good. It’s a good choice for a quilt for a man, and could incorporate old shirts to personalise it.

I loved that skirt

I incorporated left over fabric from a favourite seersucker madras skirt I made for myself which I wore till it became too faded and tatty.

Had Dad finished with that shirt mum?

Another fabric my mother used may be an old shirt of my dad’s. I suspect most fabrics were new scraps leftover from other projects. The only fabric I bought was the backing and the border. The border fabric looks good but the weave was rather loose, and may not wear as well as I would like but is wonderfully soft, and the colour works well with the disparate fabrics of the donated blocks.
The quilt is now in honourable retirement, my nephew is 18, his current taste requires bright primary colour blocks and lots of black, but that’s another quilt and deserves its own post.

Yellow

I have long nursed a plan to make an Autumn leaves quilt using every colour of Autumn:- sulphur yellow , cherry red, crimson, flame, burgundy, bright-bright Orange (another colour I won’t give houseroom to) and various shades of brown from chestnut to mouse.

I don’t do yellow, not in clothes or shoes, home ware, cars, I cannot get on with it at all and would not welcome it in any form, you won’t even find much of it in my garden….. and yet I love Autumn, when the leaves begin to turn I just want to be out in the fresh air, kicking up fallen leaves and enjoying God’s Creation.

I have a good collection of hidden yellow fabrics in my stash, because I have long nursed a plan to make an Autumn leaves quilt using every colour of Autumn:- sulphur yellow , cherry red, crimson, flame, burgundy, bright-bright Orange (another colour to which I won’t give houseroom ) and various shades of brown from chestnut to mouse. All made with a hazy blue background as if seen from beneath the tree on a cloudless blue sky. I think I need Maple leaf blocks of varying sizes to replicate Acers in Fall, they come in so many shapes and colours that I think it will work. In the mean time it feels as if I have a guilty secret, that part of my stash which never see’s the light of day, and if I do come across it by accident while looking for “Just the right fabric” , those pieces are slung aside with disdain like an unloved child.

I don’t do yellow.


But thank goodness Mother Nature does.