Cinnamon stars

there was supposed to be a delightful smell of cinnamon floating through the house as they cooked, well I had the most gruesome of colds and couldn’t smell a thing,

A few years ago I was intrigued by something I saw in a magazine, cinnamon stars which look like gingerbread but are made of apple sauce and ground cinnamon, and were said to smell wonderfully and last for years.(NB, These are decorative only, not for eating) What an excellent idea I thought, but no recipe. Recently on Pinterest I found a number of pins which gave instructions so I decided to have go.

.all you need to make cinnamon stars
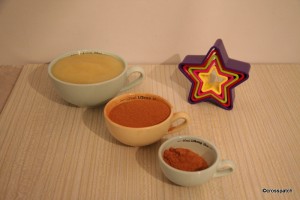
A cup of apple sauce liquidised to make sure there were no lumps in it.
A cup and a half of ground cinnamon and extra to use for rolling out
Mix together to form a dough, roll out to a quarter inch thick
Cut with shaped cutters of your choice, I bought some star cutters specially.
(and then found the ones I had worked better)I think the mixture I had wasn’t dry enough, and so the shapes were a little ragged round the edges, a drier mixture might have produced a crisper edge.
Use a skewer to make a hanging hole in each one, or two if you want to string them on a ribbon like a garland.
Bake for an hour at 180c or the lowest gas setting.

cinnamon stars
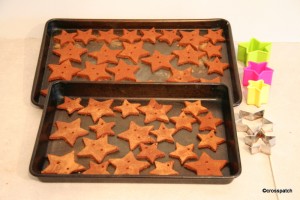
Now comes the disappointing bit, there was supposed to be a delightful smell of cinnamon floating through the house as they cooked, well I had the most gruesome of colds and couldn’t smell a thing, but then neither could anyone else. When they were cooked they looked rather mottled and cracked, not like gingerbread at all, and they don’t smell of much either. I will take a nail file to the edges in the hope of improving the finish, and if I think it’s worth it I’ll string them on ribbon for a garland to go on the tree, next year.
If you fancy having a go yourself, have plenty of cinnamon to hand to make sure you achieve the right consistency, and to make sure the edges are crisp. If you don’t have star cutters, hearts or any Christmas shape would work , or gingerbread man perhaps.

Craft for Christmas

I love the smell of clove oranges and always make some for Christmas, and put them by my chair so that I can enjoy the fragrance, heaven!

In the run up to Christmas, I always think I will have time to be creative and make gifts rather than buying them, Pinterest has a lot to answer for!
I also thought that I would have time to blog what I have made, then Christmas arrived, work went viral, home life was hectic and the cold virus crept up to bite me too. I didn’t finish the present wrapping till 22.20 on Christmas Eve, and the cards got posted on the last posting day. So let me tell you what I did manage to achieve.

Limoncello ready to be bottled and given
nearly ready

The Limoncello (see a still life with lemons) was filtered and bottled, I tried the coffee filters but it didn’t work very well, so I used a double layer of muslin in a sieve over a funnel, which worked much better. It made a litre and a half of Limoncello. The 500ml bottles were cordial bottles that I have put aside once empty specifically for the purpose. I kept one bottle for myself, gave one to my sister, and put the rest in a beautiful Victorian cut glass decanter I found at an antiques fair in the summer and gave it to my Mum.

There’s something very evocative of Christmas in the smell of spices, I love the smell of clove oranges and always make some for Christmas, and put them by my chair so that I can enjoy the fragrance, heaven! If you want them to last you should wrap them in paper and put them in a warm dry place till they have dried, and then they won’t go mouldy, but if you do they look desiccated and not nearly so pretty. I prefer my clove oranges to have a short but pretty lifespan.
all you need to make a clove orange
They are so easy to make, just take an orange, a cocktail stick, some ribbon and some cloves. I tie the ribbon on first giving me four quarters to fill, and allowing the cloves to be placed to keep the ribbon in place. Use a cocktail stick to make a hole to push the clove into, if you try to use the clove to make the hole you will find the bud of the clove will be crushed by your finger as you push it in, and it will fall off leaving just the stem behind.

making clove oranges for Christmas

They make nice little stocking gifts wrapped in cellophane, but you’d need to make them the night before they are given to be sure they are given in perfect condition.

a little bit of Christmas
smells wonderful, tastes better.

And so happy Christmas Mum.

Christmas is coming

thank goodness I didn’t make them bigger, stockings have to be well filled at Christmas, a thin and meagre stocking is so dispiriting isn’t it?

And I need to finish a project I began 5 years ago, we were driving to Hull and back twice each weekend to facilitate contact with   my Dearest’s 7 yr old son and 11 yr old daughter. To while away the long car journeys and thinking I might have two children staying with us at Christmas, I began to make them a stocking each to hang at the fireplace.
I have already made a number of Christmas stockings but they are for adults and generally fairly small for the kind of little stocking gifts that amuse adults, these stockings would need to be bigger, much bigger.

I can’t remember where I got the original pattern from, but it has been modified a number of times over the years. There are plenty of stocking patterns on the net if you’d like to try this yourself.
The fabric was my quilt group’s Christmas challenge fabric for 2007, sadly I’m five years too late to enter the challenge, but they will be finished this Christmas, come what may!  There were two colours of co-ordinating fabric, and a collection of small panels. I chose two matching panels one for each side of each stocking, a different colour way for each stocking, so that I could tell them apart.

The panels were applied using bondaweb, and the edge stitched with Gold thread using a fancy machine stitch. I used a stitch which reminded me of icicles, it would have worked far better in silver but the embellishment on the fabric is gold, so my embellishments had to be gold too.


I will have to quilt the panels in gold tread before I stitch up the sides of the stockings, and I haven’t quite worked out how I will quilt them, but probably the holly leaves and berries, which I have used before. It’s easy to create your own quilting patterns or stencils, I found a simple line drawing of a holly leaf and berries on an advertising handbill, scaled it up and cut it out of cereal box. I might have used plastic film if I needed to use it on an entire quilt, but cereal packet is fine for a few uses.

Each stocking will have metre of ribbon folded in half and stitched into the back seam so it can be tied with a bow to whatever I want to attach it to, the banister rails are a favourite place.
I plan, if I have time to make a swing tag,a gift tag to hang from each stocking like the little dog on a Radley handbag, with just an initial for each of them V and T, the children are now 12 and 16, their gifts tend to be smaller and more expensive than back then, so the stockings are probably large enough, thank goodness I didn’t make them bigger, stockings have to be well filled at Christmas, a thin and meagre stocking is so dispiriting isn’t it?

Pinwheel Quilt

Looking at it now I think it reminds me of the sugar bag quilts of the 1930’s, it’s a happy quilt, and deserves to be seen.

This is one of the first quilts I made circa 1985, and the first I think which expressed my love of bright colours. It was intended as my own bed quilt. Not sure why, but I don’t think it ever sat on my bed, or was ever slept under.  I suspect that by the time it was finished I already despised it, made as it was with (shock, horror) polyester cotton sheeting! I didn’t really know any better back then, I think I was a student at the time so money was in short supply. Finding fabrics in saturated colour was difficult, and 100% cottons almost unheard of, quilt supplies hard to find. It was made with really thick polyester wadding so it is not heavily quilted, but it is quite puffy and pillowy. I think it would benefit from more quilting, but I’m not planning to do any more, I’d have to re tack it, and as it’s hand quilted, the additions would have to be hand quilted too, it’s a long time since I hand quilted anything, I’m terrible at it, as you can see if you look closely.


To see how the block is made  you need to see it as a four patch, divide the block into 4 quarters diagonally and vertically; each of these squares is made up of two triangles, each of which is made of 4 pieces, which when put together make the pinwheel in the centre and the frame surrounding it.


It began well but I suspect I lost interest after making twelve blocks, another row would have required an additional 18 blocks, instead of which I made 4, one for each corner and finished it off with very wide borders.  It did mean that there was plenty of colour in the quilt, perhaps if I’d had more pinwheel blocks it would not have given as much impression of colour, the balance of colour and white in the finished quilt would have been more even, and perhaps more anaemic.

see that 60’s fabric yet again 12.00 till 2.00


Looking at it now I think it reminds me of the sugar bag quilts of the 1930’s, it’s a happy quilt, and deserves to be seen. I might put it on the bed in my studio, rather than allow it to languish unseen in a packing box in the corner of that room. Then at least it will be slept under occasionally. I sometimes retire to that bed in the middle of the night if I cannot sleep; too hot (me), or too much snoring (not me).

The Quilt on my bed

my Dearest likes a 14 tog duvet, while I’d be happy with 4 togs (it’s my age, I’m told). In that single week in May we call Summer when the nights are warm and the duvet is cast off the bed, a sheet and this quilt suffice to sleep under.

This is the quilt which lives in my bedroom and is the first to be put on the bed if extra warmth is required, admittedly rarely because my Dearest likes a 14 tog duvet, while I’d be happy with 4 togs (it’s my age, I’m told). In that single week in May we call Summer when the nights are warm and the duvet is cast off the bed, a sheet and this quilt suffice to sleep under. It is my most used quilt but my Dearest still gets told off for sitting on it “en deshabille”.

The block is a simple collection of 16 x 2 inch squares put together randomly from scraps to create a 6 inch square, each block is interspersed with another block made of 4 quarter square triangles in ivory and burgundy, which are then placed with the colours positioned alternately in each row; so that each block of scraps appears to be set in the centre of a larger square of either ivory of burgundy.


Again I used some of my favourite tiny scraps, my 1960’s dress fabric features again, probably only because it could be made from such tiny pieces, and all I had left were the tiniest scraps. In fact I tend to cut 2 inch squares if I can from any fabric scraps I have left, on the grounds that if I can’t get a 2 inch square out of it, it probably isn’t worth keeping. These are then stored in a tin for my next scrap quilt project. It is hand and machine quilted very simply in ivory thread, I didn’t think it needed anything elaborate, scrap quilts don’t, their beauty lies in the fabrics.

The quilt is titled Remembrance, the blocks were a ”Block of the month” challenge which I won sometime back in 1996; made into a quilt that year and exhibited the following year. I didn’t attend the group meeting the night I won the blocks, I had been at a funeral that day, my cousin had lost a long fight with cancer. I thought of her often as I made this quilt, she was younger than me and the first person I had lost still in the flower of youth. Over the years this quilt has been packed away, or otherwise hidden from view, but whenever it surfaced my cousin was always my first thought when I saw it again, it might seem morbid but it isn’t to me, I’m happy to be reminded of her, she was a beautiful woman, and she lived her life. My memories of her are happy ones.

The Old Girl’s dead, are we downhearted? Not at all!

sadly the old jalopy died and was towed away to the scrap heap

In case you may be wondering, sadly the old jalopy died and was towed away to the scrap heap. Fortunately, being a sensible girl, I had a little money put aside in case of this very eventuality, and so we now have a shiny new (to us at least) BMW parked outside the house. My Dearest is the proud owner, (well registered keeper at any rate) of a very smart BMW 320 D touring, which he says he will let me drive occasionally. He is so pleased with it he keeps looking out of the window to admire it! He even goes out and sits in it, and tomorrow he is going to clean and polish it. Aww, bless! My little precious MX5 is still taxed and on the road until the end of the month, but as the weather forecasters are promising us snow, and plenty of it, I shall be following my previous plan and tucking her up for the winter by December.

A still life with lemons

“ When life gives you lemons make lemonade”

We all know the old saying “ When life gives you lemons make lemonade” although I prefer “when life gives you lemons reach for salt and Tequila” either way I seem to be getting more than my fair share of lemons lately, so I decided to get my own back by turning a few lemons into Limoncello.

Still life with lemons

Here’s my still life with lemons, one litre bottle of budget Vodka, 500grams sugar, 6 unwaxed lemons, and a large screw top jar.


First thinly peel the lemons being extra careful not to take any white pith off as this is bitter.


Then squeeze the lemons.

only two weeks to go.

Put the sugar in a pan with 200 ml of boiling water and simmer till dissolved, add the peel, bring to the boil and simmer for 15mins, then add the lemon juice, bring back to the boil and simmer for a further 5 minutes. Allow to cool for 15 minutes so you don’t damage the glass jar when you decant it. Finally pour into the jar, add the Vodka, and screw on the lid. Gently shake the jar every two days for two weeks.
Strain the liqueur into bottles, (a coffee filter in a funnel works best if you have one), add a little peel for decorative effect and label. Serve chilled as an after dinner treat.

Indian Summer

I found old and broken heating grills in the derelict greenhouse which would make interesting quilting designs, and an old rusting metal chair with an anthemion design, simplified but nevertheless a potential quilting design.

Just as the Summer was turning into Autumn, and in search of some Autumn colour we went one Sunday for a country drive to an out of the way little teashop we know. The Apple Store is set in a lovely spot on the edge of the Trough of Bowland, an area of outstanding natural beauty, on a country estate. It’s a great place for walkers, and I love it for its trees and the fact that I can sit in the garden of a grand house to enjoy my tea under a huge Ginko tree which must be over a hundred years old. The business is new and a work in progress, the owners are doing up the facilities incrementally as resources allow.


Whilst waiting for my tea to be delivered I was free to wander about with my camera, as further evidence that you can find inspiration for quilting everywhere, I found old and broken heating grills in the derelict greenhouse which would make interesting quilting designs, and an old rusting metal chair with an anthemion design, simplified but nevertheless a potential quilting design.


After tea and cake we walked up the hill towards open moorland and along a road that was wick with young game birds, marvelling at the damage to the roads that flooding had done this summer, and wondering if we will ever see again summers like the long hot summer of 1976.

A fine day at last

The plan was to drive up to Sandside and stop by the roadside with a view of the Kent Estuary, and the snowy fells beyond to eat our picnic, but it was not to be.

A sunny day to round off my rainy hiatus between jobs, so we took the opportunity afforded by my little convertible not being mothballed for the winter quite yet and went out in it with the top down (and plenty of warm layers on) I’ve known it to be warm and balmy into November but this November isn’t one of those, in fact there’s snow on the Lakeland hills already.

Brrrr, snow already

We drove to Silverdale and then on to Arnside where we stopped to buy a picnic in a local bakery, the plan was to drive up to Sandside and stop by the roadside with a view of the Kent Estuary, and the snowy fells beyond to eat our picnic, but it was not to be, before we got there we met with a couple of women standing in the road flagging down the traffic and turning us back, there had been a road accident ahead, and they were trying to keep the road clear for the ambulance. I have to admit my first thoughts were hardly charitable.

My pride and joy, and my Dearest with pie

We ate our picnic in a less salubrious spot, and a very disappointing picnic it was too, maybe I should pack one myself next time.

Things can only get better?

I received a text from my sister, “Things can only get better?” my Niece’s car was dead on the drive, possibly a dead battery, that’s not fair reward for her kindness now is it?

While writing the last long blog and thinking things couldn’t get any worse, they did!
On the morning of the 2nd Nov I received a text from my sister, “Things can only get better?” my Niece’s car was dead on the drive, possibly a dead battery, that’s not fair reward for her kindness now is it?

Meanwhile I have been struggling to get on line at all, I made the mistake of allowing a teenager access to my laptop, consequently it is now so full of malware and pop-ups that it won’t run, not even Facebook, I’m bereft of contact with the outside world. Another disaster, well perhaps that’s overstating the case somewhat.