On the subject of being lucky

With a heavy heart I reached for the secret yellow stash, cut a couple of apple cores and threw them into the mix… presto! The whole thing started to come together.

Going back to the Sizzix Big shot, I have now solved my little dilemma, and indeed the dreaded yellow was the answer. I had spent a few nights trying to think how I might avoid using the dreaded yellow and came up with an idea that a lime or apple green might work but on looking again at what was already cut I found I had already introduced a pale apple green, so that would not work. With a heavy heart I reached for the secret yellow stash, cut a couple of apple cores and threw them into the mix… presto! The whole thing started to come together.

first Apple Core Quilt

Then I went to my stash for a royal blue for the border but again…. it just wasn’t working, so off to the fabric shop I went,…..lavender blue? no, Airforce blue? no, Navy blue? no…..what about turquoise? Turquoise it is! I may even bind it in yellow too, but I’ve got time to ponder that while I do the quilting.
So next dilemma… how to quilt, and what to back it with?

A new quilt every time we redecorate; madness.

Quilts are for using, and enjoying, signs of wear are badges of honour for a quilt.

Sally's quilt full size

Here’s an idea for a quick quilt to match your bedroom décor. This quilt was made by my mother for her granddaughter, my sister’s daughter. Sally had recently repainted her bedroom and her mother had bought her new bedding to tone in with the Lavender walls. Her old quilt no longer fitted in with this new colour scheme, and a new quilt was required.Sally's quilt;backing

My mother, went back to the shop where the bedding had been bought and bought a king size duvet cover in the same pattern, one side had very large cabbage roses printed on it, not suitable for cutting into small pieces, so that side would be used for the backing, the other side an easier fabric to cut up being an all over swirling pattern.
Using small amounts of toning fabric, a paler green Broderie Anglaise, bright and greyed Lavenders, dark Blue, and Teal green, with large amounts of the duvet fabric in an oversized 18inch block, she achieved a pattern apparently floating in space.
Sally's quilt detail 2
I have been looking at the photographs trying to see where the block begins and ends. I think it’s an asymmetric 4 patch block, 4 of which are placed in the centre of the quilt each one rotated 90 degrees from its neighbour. There’s an extra half block strip top and bottom to make the quilt rectangular.It was a lovely quilt when it was made, and a great idea for making a quilt to tone in with an existing décor.

Sally's quilt detail 1

The bedding was polycotton and has long since worn out and been made into dusters, and the quilt, although still in existence, up close has the appearance of worn poly fabrics, stray fibres pilling across surface. I think I could shave them off with a safety razor to improve the appearance, but to be honest I like the fact that it shows wear and tear, it is what it is, and sometimes when well used quilts are a little tatty, they invite further use. No longer preciously perfect, they can be used, thrown about, even sicked on without conscience, and enjoyed.
When I see a quilt which has lived it’s life packed away in a drawer kept for best, or for a wedding day which never happened, I feel sorry that someone’s handiwork lost its purpose, and the point of its making was missed. Quilts are for using, and enjoying, signs of wear are badges of honour for a quilt.

A Valentine Rose from my Mother

a perfect little gift for Valentine’s Day, a keepsake, a rose that won’t wither. Thanks Mum, I love you too.

Pictured is a little piece of work of my mother’s which she gave me, a rose for St Valentine’s Day, this is a sweet little hanging which is paper pieced using four different patterned fabrics to create the rose flower plus a single green for the leaves. The flower centre is from the fabric used for the binding, mum has used yellow French knots of embroidery silks to create the sense of pollen covered anthers in the rose centre.

Valentine Rose

This was a challenge, I think the theme was celebration, and this is a perfect little gift for Valentine’s Day, a keepsake, a rose that won’t wither. Thanks Mum, I love you too.

A challenging challenge

I like the curvy line quilting because it’s easy to do and does not rely on the accuracy of the piecing, in fact if your piecing is not accurate curvy line quilting is very forgiving. That’s always a good thing.

What do you do if you don’t like the challenge block? Hide it.

Cecily's favourite churn dash block

This Lap quilt is made using the Churn Dash block (or monkey wrench), I think it was the favourite block of our most venerated late member and the instigator of our quilt group’s challenge, Cecily. But I dislike it. I wanted to rise to the challenge as always but I find the block rather pedestrian, perhaps because I’ve only made it in co-ordinated colours and plain fabrics, so a decided to do it in heavily patterned fabrics and mix it up so that the pattern was lost and the fabric became the star of the piece rather than the block.
Good idea, but I think I took it too far, the pattern is completely lost and with it the sense of rhythm to the quilt top, as a consequence what stands out are the pale squares, rather than the fabric in general. All of the fabrics are Liberty scraps from the printer’s factory shop, I’m so lucky to live nearby; I call in occasionally to buy craft packs, but I can also buy off the roll if I have a big project in mind.

Detail of quilting on Churn Dash quilt

In other senses I’m happy with the quilt; it hangs beautifully flat and straight and is evenly quilted throughout. I created my own wavy line quilt guide using taped together strips of cereal packet, with a hand drawn wavy line. On one side the wavy edge has wide and fairly flat curves, on the other side they are closer together and therefore appear deeper. I used the flatter side, drew on the lines with an air dispersible pen, and chalk pencil taking the quilt pattern right out in a continuous line to the edge of the quilt.
I like the curvy line quilting because it’s easy to do and does not rely on the accuracy of the piecing, in fact if your piecing is not accurate curvy line quilting is very forgiving. That’s always a good thing.

Am I a lucky girl?

I have pulled a few fabrics from my stash and cut them into apple cores but together they lack a certain something………maybe….. as it’s a scrap quilt I should just throw it all in and let it all hang out, wherever the fabrics fall… if you see what I mean, and pardon my clichés.

Santa brought me a Sizzix Big Shot, I’d seen apple core quilts on Pinterest and coveted them, so when I discovered how the pieces were cut I coveted the Sizzix machine as well, but I couldn’t justify buying one just to have a go at making a quilt. My Dearest however thought it would make an excellent gift this Christmas. I am delighted with it and have already begun cutting apple cores from my stash.

The Sizzix Big Shot

If you are not familiar with this piece of equipment it’s a die cutter, basically a miniature mangle, which presses dies (a shape cutting blade) onto whatever you want to cut the shape in, paper, card or fabric, mostly used by card makers and other crafty people. I have already worked out that I can use it for appliqué, with bondaweb, and to make other paper crafts as yet not crystalised but bubbling away at the back of my head ( no doubt you’ll be the first to know when I get round to trying out my as yet vague ideas)
I always find myself wondering how other quilters manage to make such well balanced colour coordinated Scrap quilts, I generally find I struggle to have the right amount of sufficient variation of colour and pattern to make a balanced quilt; do you think maybe they cheat? Maybe they go out and buy new fabrics to achieve the look they want and then just call it a scrap quilt? Surely not!
I have pulled a few fabrics from my stash and cut them into apple cores but together they lack a certain something, I’m not sure what exactly and don’t want to cut any more till I know what it is that’s missing; the dreaded yellow perhaps, or maybe greater variation of darks and lights, at the moment what I have cut are mainly mid shades. I shall need to pull out a great many more fabrics from my stash and throw them in a pile I think, then pare it back, pulling out the ones that don’t work, till I have the right mix.

my first apple core quilt in the making

Having said that I think one of my weaknesses is a need to control, perhaps, as it’s a scrap quilt I should just throw it all in and let it all hang out, wherever the fabrics fall… if you see what I mean, and pardon my clichés.
The truth is I didn’t pull out of my stash the fabrics I love, I pulled out the fabrics I could spare, the unloved and languishing bits, so it’s no wonder they aren’t yet making an inspiring mix. I need inspiration, one or two well chosen fabrics to pull it all together, or white, or navy? Oh Help! What I really need is a few days of free time in my studio to let this quilt come together.

Scrap comforter

One of my most used quilts, most washed and cuddly, the one that gets to sit on my knee when I’m ill is this one

One of my most used quilts, most washed and cuddly, the one that gets to sit on my knee when I’m ill is this one. It isn’t really a quilt as it has only two layers, the back being fleece. I based it on the Double Irish Chain, traditionally made in red and white. This one was made with my favourite hyacinth blue and a collection of my two inch scrap squares.

It is made up of two alternating blocks one block is made up of 25 two inch squares put together randomly apart from the centre square in each side which is the hyacinth blue fabric; the other block is a 4” square of the hyacinth fabric, surrounded by 4“ x 2” rectangles of hyacinth, topped and tailed with a random 2” scrap. When put together alternately the two blocks blend into squares and chains.


Sadly it has become rather faded over time, but still goes with us when we go camping and is a great comfort on chilly summer evenings. It sits on the back of the sofa in winter ready to go over a lap when a nod in the chair is needed, and even gets the occasional trip in the sports car if the roof is down and the weather less than perfect. I’m not precious about this one it’s just a comforter and a great comfort it has been, the epitome of what a quilt should be, bright and cheerful, soft and warm, always to hand when needed.

There in the middle is that fabric again, no show without Punch!

I think this was the last quilt I made which has a little of that old dress fabric in it.

More Christmas Stockings

You might want to consider tucking a ribbon (to use as a hanger) into the back seam of the outer pair, but remember to put it between the seam on the INSIDE before you stitch it, you don’t want it between the outer and the lining do you?

If you want to make your own quick and easy Christmas stockings you can buy ready printed panels, or simply choose a Christmassy fabric and a simple lining. Once you have found or drafted a pattern you are happy with cut two stockings from the outer fabric and two from the lining, make sure you cut them right sides of the fabric together so you get a left and a right, rather than two lefts or two rights.

Stitch each outer and its lining together along the top edge, then lay the two right sides together outer on outer, lining on lining and stitch right round the whole piece, leaving a gap on the back seam of the lining as indicated between the points of the scissors in the photo

You can then turn the whole thing right sides out, hand stitch the opening in the lining closed and then tuck the lining in.
You might want to consider tucking a ribbon (to use as a hanger) into the back seam of the outer pair, but remember to put it between the seam on the INSIDE before you stitch it, you don’t want it between the outer and the lining do you?
You might also want to top stitch the top edge to stop the lining rolling out, and a few stitches in the seam at the toe to hold the lining in place. And if you aren’t wadding and quilting then choose a furnishing fabric to give some substance to your stocking.

Christmas is coming

thank goodness I didn’t make them bigger, stockings have to be well filled at Christmas, a thin and meagre stocking is so dispiriting isn’t it?

And I need to finish a project I began 5 years ago, we were driving to Hull and back twice each weekend to facilitate contact with   my Dearest’s 7 yr old son and 11 yr old daughter. To while away the long car journeys and thinking I might have two children staying with us at Christmas, I began to make them a stocking each to hang at the fireplace.
I have already made a number of Christmas stockings but they are for adults and generally fairly small for the kind of little stocking gifts that amuse adults, these stockings would need to be bigger, much bigger.

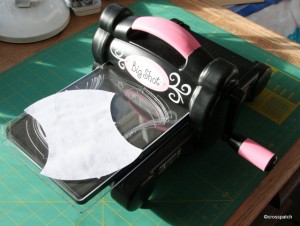
I can’t remember where I got the original pattern from, but it has been modified a number of times over the years. There are plenty of stocking patterns on the net if you’d like to try this yourself.
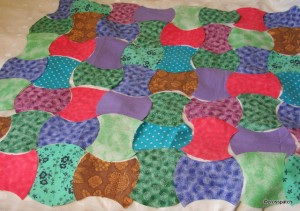
The fabric was my quilt group’s Christmas challenge fabric for 2007, sadly I’m five years too late to enter the challenge, but they will be finished this Christmas, come what may!  There were two colours of co-ordinating fabric, and a collection of small panels. I chose two matching panels one for each side of each stocking, a different colour way for each stocking, so that I could tell them apart.

The panels were applied using bondaweb, and the edge stitched with Gold thread using a fancy machine stitch. I used a stitch which reminded me of icicles, it would have worked far better in silver but the embellishment on the fabric is gold, so my embellishments had to be gold too.


I will have to quilt the panels in gold tread before I stitch up the sides of the stockings, and I haven’t quite worked out how I will quilt them, but probably the holly leaves and berries, which I have used before. It’s easy to create your own quilting patterns or stencils, I found a simple line drawing of a holly leaf and berries on an advertising handbill, scaled it up and cut it out of cereal box. I might have used plastic film if I needed to use it on an entire quilt, but cereal packet is fine for a few uses.

Each stocking will have metre of ribbon folded in half and stitched into the back seam so it can be tied with a bow to whatever I want to attach it to, the banister rails are a favourite place.
I plan, if I have time to make a swing tag,a gift tag to hang from each stocking like the little dog on a Radley handbag, with just an initial for each of them V and T, the children are now 12 and 16, their gifts tend to be smaller and more expensive than back then, so the stockings are probably large enough, thank goodness I didn’t make them bigger, stockings have to be well filled at Christmas, a thin and meagre stocking is so dispiriting isn’t it?

Pinwheel Quilt

Looking at it now I think it reminds me of the sugar bag quilts of the 1930’s, it’s a happy quilt, and deserves to be seen.

This is one of the first quilts I made circa 1985, and the first I think which expressed my love of bright colours. It was intended as my own bed quilt. Not sure why, but I don’t think it ever sat on my bed, or was ever slept under.  I suspect that by the time it was finished I already despised it, made as it was with (shock, horror) polyester cotton sheeting! I didn’t really know any better back then, I think I was a student at the time so money was in short supply. Finding fabrics in saturated colour was difficult, and 100% cottons almost unheard of, quilt supplies hard to find. It was made with really thick polyester wadding so it is not heavily quilted, but it is quite puffy and pillowy. I think it would benefit from more quilting, but I’m not planning to do any more, I’d have to re tack it, and as it’s hand quilted, the additions would have to be hand quilted too, it’s a long time since I hand quilted anything, I’m terrible at it, as you can see if you look closely.


To see how the block is made  you need to see it as a four patch, divide the block into 4 quarters diagonally and vertically; each of these squares is made up of two triangles, each of which is made of 4 pieces, which when put together make the pinwheel in the centre and the frame surrounding it.


It began well but I suspect I lost interest after making twelve blocks, another row would have required an additional 18 blocks, instead of which I made 4, one for each corner and finished it off with very wide borders.  It did mean that there was plenty of colour in the quilt, perhaps if I’d had more pinwheel blocks it would not have given as much impression of colour, the balance of colour and white in the finished quilt would have been more even, and perhaps more anaemic.

see that 60’s fabric yet again 12.00 till 2.00


Looking at it now I think it reminds me of the sugar bag quilts of the 1930’s, it’s a happy quilt, and deserves to be seen. I might put it on the bed in my studio, rather than allow it to languish unseen in a packing box in the corner of that room. Then at least it will be slept under occasionally. I sometimes retire to that bed in the middle of the night if I cannot sleep; too hot (me), or too much snoring (not me).

The Quilt on my bed

my Dearest likes a 14 tog duvet, while I’d be happy with 4 togs (it’s my age, I’m told). In that single week in May we call Summer when the nights are warm and the duvet is cast off the bed, a sheet and this quilt suffice to sleep under.

This is the quilt which lives in my bedroom and is the first to be put on the bed if extra warmth is required, admittedly rarely because my Dearest likes a 14 tog duvet, while I’d be happy with 4 togs (it’s my age, I’m told). In that single week in May we call Summer when the nights are warm and the duvet is cast off the bed, a sheet and this quilt suffice to sleep under. It is my most used quilt but my Dearest still gets told off for sitting on it “en deshabille”.

The block is a simple collection of 16 x 2 inch squares put together randomly from scraps to create a 6 inch square, each block is interspersed with another block made of 4 quarter square triangles in ivory and burgundy, which are then placed with the colours positioned alternately in each row; so that each block of scraps appears to be set in the centre of a larger square of either ivory of burgundy.


Again I used some of my favourite tiny scraps, my 1960’s dress fabric features again, probably only because it could be made from such tiny pieces, and all I had left were the tiniest scraps. In fact I tend to cut 2 inch squares if I can from any fabric scraps I have left, on the grounds that if I can’t get a 2 inch square out of it, it probably isn’t worth keeping. These are then stored in a tin for my next scrap quilt project. It is hand and machine quilted very simply in ivory thread, I didn’t think it needed anything elaborate, scrap quilts don’t, their beauty lies in the fabrics.

The quilt is titled Remembrance, the blocks were a ”Block of the month” challenge which I won sometime back in 1996; made into a quilt that year and exhibited the following year. I didn’t attend the group meeting the night I won the blocks, I had been at a funeral that day, my cousin had lost a long fight with cancer. I thought of her often as I made this quilt, she was younger than me and the first person I had lost still in the flower of youth. Over the years this quilt has been packed away, or otherwise hidden from view, but whenever it surfaced my cousin was always my first thought when I saw it again, it might seem morbid but it isn’t to me, I’m happy to be reminded of her, she was a beautiful woman, and she lived her life. My memories of her are happy ones.