When I have a few hours to spare…. Some time in the next 5 years! I think I have the right two fabrics to make another one of these.
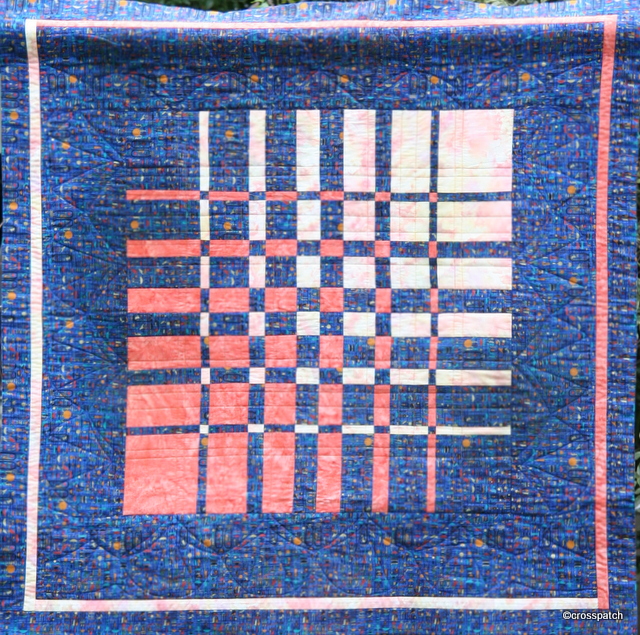
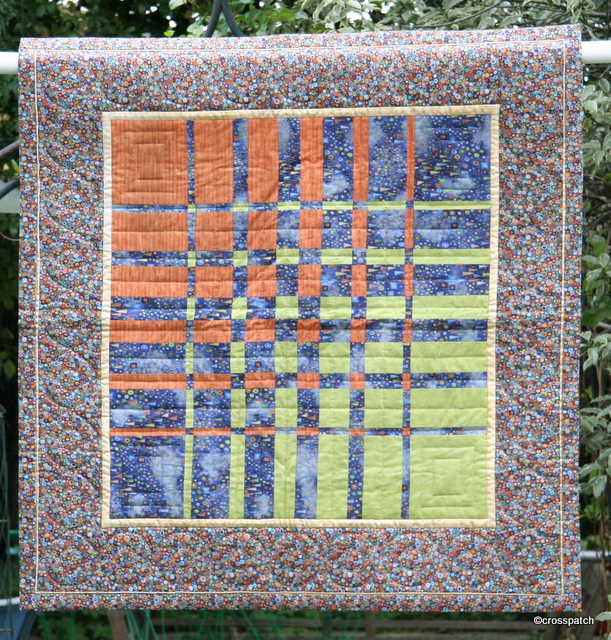
Here are two more quilts made from the inspiring work of Ricky Tims, not mine I’m afraid, these two were both made by my Mother.
The first probably made at the same time as my first and to the same instructions, I think we may have been lent a book or attended a workshop together.
The second, I’m sure was made in response to a Women’s Institute Challenge to use a particular challenge fabric inspired by Gustav Klimt. Or perhaps it was made from the left over fabric. The lime and copper fabrics look to be plains while the other two fabrics are patterned fabrics which have patterns taken from the paintings of Klimt, I particularly love the blue.
When I have a few hours to spare…. Some time in the next 5 years! I think I have the right two fabrics to make another one of these.
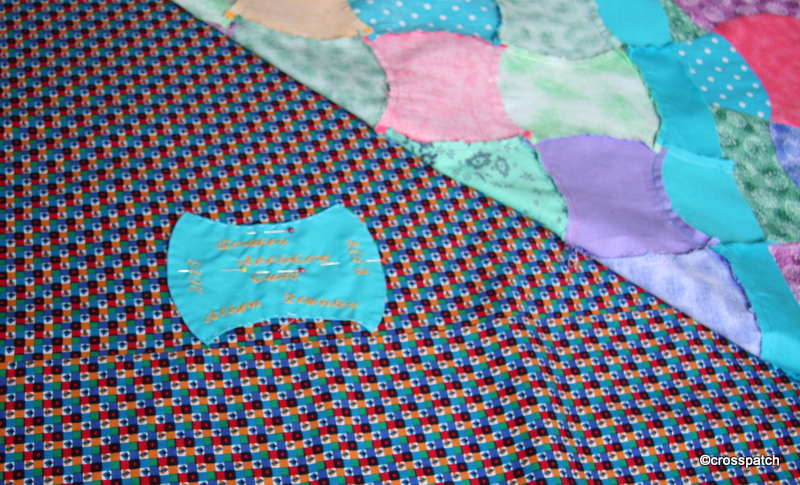
If the label goes on before the quilt is put together and quilted through, then it’s difficult to remove, it can only be covered up by someone who might wish to change its history or attribution, ( I mean pass it off as their own) later to be happily rediscovered, when the stitching begins to come apart.
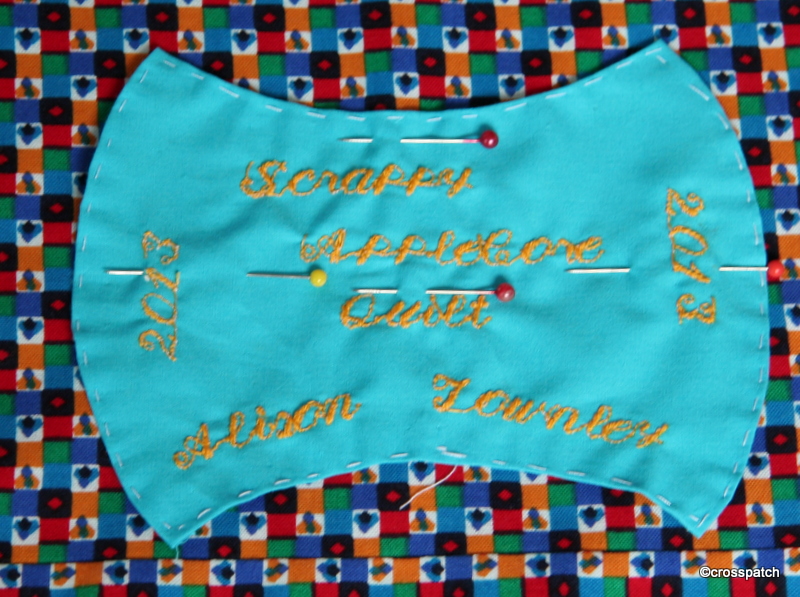
I have used a spare apple core for the quilt label, and my lovely Janome sewing machine supplied the pretty script to write the words, “Scrappy Apple Core Quilt” My name and the date. It’s really important to put a label on the back of every quilt you make and to put it on before you put the quilt together and quilt it. Why? Many reasons; posterity for one, if your quilt is treasured and survives for hundreds of years as some do, the owners will one day wonder who made it, when and why – so tell them.
Quilts are used to evidence the history of fabrics and fashions but only if they can be reliably dated. Let the historians be happy to have found a dateable treasure in your quilt.
If the label goes on before the quilt is put together and quilted through, then it’s difficult to remove, it can only be covered up by someone who might wish to change its history or attribution, ( I mean pass it off as their own) later to be happily rediscovered, when the stitching begins to come apart.
If the quilt is made specifically for a person or to celebrate an event in someone’s life, then put it on the quilt label, but be warned….. I once heard of a quilt that was made to celebrate a marriage, it took so long to make that the couple had divorced before it was completed.
The backing was a happy find in my stash, it’s what was left over from the backing of a much larger quilt, the left over piece was too wide but not long enough, however there was a long strip that I cut off the side of the previous quilt backing, so I managed to stitch on the strip and make a square big enough for the backing of this quilt. There’s a little bit over, perhaps it will back the cushion I might make to go with the quilt. And there’s even enough for the hanging sleeve, how lucky is that!
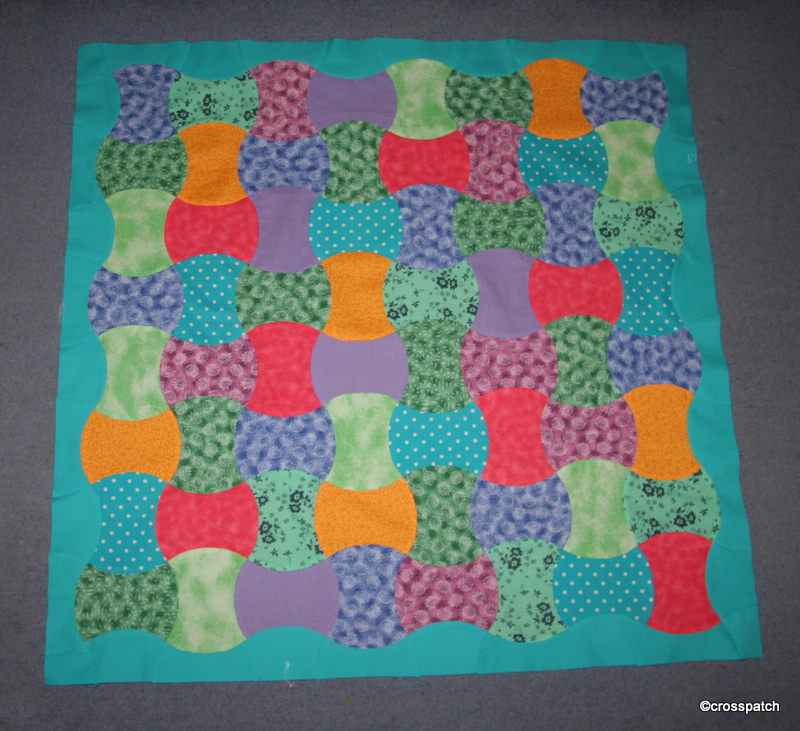
With a heavy heart I reached for the secret yellow stash, cut a couple of apple cores and threw them into the mix… presto! The whole thing started to come together.
Going back to the Sizzix Big shot, I have now solved my little dilemma, and indeed the dreaded yellow was the answer. I had spent a few nights trying to think how I might avoid using the dreaded yellow and came up with an idea that a lime or apple green might work but on looking again at what was already cut I found I had already introduced a pale apple green, so that would not work. With a heavy heart I reached for the secret yellow stash, cut a couple of apple cores and threw them into the mix… presto! The whole thing started to come together.
Then I went to my stash for a royal blue for the border but again…. it just wasn’t working, so off to the fabric shop I went,…..lavender blue? no, Airforce blue? no, Navy blue? no…..what about turquoise? Turquoise it is! I may even bind it in yellow too, but I’ve got time to ponder that while I do the quilting.
So next dilemma… how to quilt, and what to back it with?
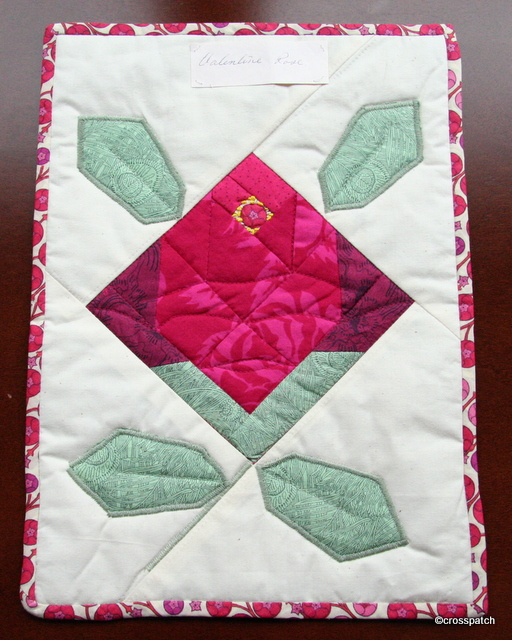
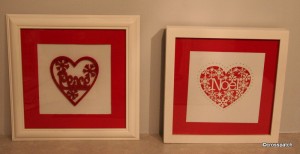
a perfect little gift for Valentine’s Day, a keepsake, a rose that won’t wither. Thanks Mum, I love you too.
Pictured is a little piece of work of my mother’s which she gave me, a rose for St Valentine’s Day, this is a sweet little hanging which is paper pieced using four different patterned fabrics to create the rose flower plus a single green for the leaves. The flower centre is from the fabric used for the binding, mum has used yellow French knots of embroidery silks to create the sense of pollen covered anthers in the rose centre.
This was a challenge, I think the theme was celebration, and this is a perfect little gift for Valentine’s Day, a keepsake, a rose that won’t wither. Thanks Mum, I love you too.
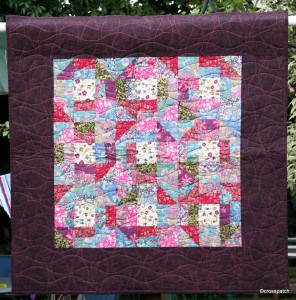
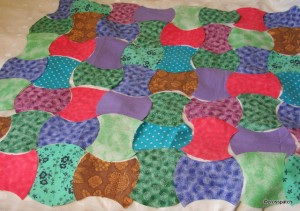
I like the curvy line quilting because it’s easy to do and does not rely on the accuracy of the piecing, in fact if your piecing is not accurate curvy line quilting is very forgiving. That’s always a good thing.
What do you do if you don’t like the challenge block? Hide it.
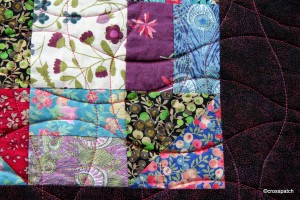
This Lap quilt is made using the Churn Dash block (or monkey wrench), I think it was the favourite block of our most venerated late member and the instigator of our quilt group’s challenge, Cecily. But I dislike it. I wanted to rise to the challenge as always but I find the block rather pedestrian, perhaps because I’ve only made it in co-ordinated colours and plain fabrics, so a decided to do it in heavily patterned fabrics and mix it up so that the pattern was lost and the fabric became the star of the piece rather than the block.
Good idea, but I think I took it too far, the pattern is completely lost and with it the sense of rhythm to the quilt top, as a consequence what stands out are the pale squares, rather than the fabric in general. All of the fabrics are Liberty scraps from the printer’s factory shop, I’m so lucky to live nearby; I call in occasionally to buy craft packs, but I can also buy off the roll if I have a big project in mind.
In other senses I’m happy with the quilt; it hangs beautifully flat and straight and is evenly quilted throughout. I created my own wavy line quilt guide using taped together strips of cereal packet, with a hand drawn wavy line. On one side the wavy edge has wide and fairly flat curves, on the other side they are closer together and therefore appear deeper. I used the flatter side, drew on the lines with an air dispersible pen, and chalk pencil taking the quilt pattern right out in a continuous line to the edge of the quilt.
I like the curvy line quilting because it’s easy to do and does not rely on the accuracy of the piecing, in fact if your piecing is not accurate curvy line quilting is very forgiving. That’s always a good thing.
I have pulled a few fabrics from my stash and cut them into apple cores but together they lack a certain something………maybe….. as it’s a scrap quilt I should just throw it all in and let it all hang out, wherever the fabrics fall… if you see what I mean, and pardon my clichés.
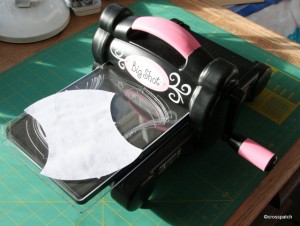
Santa brought me a Sizzix Big Shot, I’d seen apple core quilts on Pinterest and coveted them, so when I discovered how the pieces were cut I coveted the Sizzix machine as well, but I couldn’t justify buying one just to have a go at making a quilt. My Dearest however thought it would make an excellent gift this Christmas. I am delighted with it and have already begun cutting apple cores from my stash.
If you are not familiar with this piece of equipment it’s a die cutter, basically a miniature mangle, which presses dies (a shape cutting blade) onto whatever you want to cut the shape in, paper, card or fabric, mostly used by card makers and other crafty people. I have already worked out that I can use it for appliqué, with bondaweb, and to make other paper crafts as yet not crystalised but bubbling away at the back of my head ( no doubt you’ll be the first to know when I get round to trying out my as yet vague ideas)
I always find myself wondering how other quilters manage to make such well balanced colour coordinated Scrap quilts, I generally find I struggle to have the right amount of sufficient variation of colour and pattern to make a balanced quilt; do you think maybe they cheat? Maybe they go out and buy new fabrics to achieve the look they want and then just call it a scrap quilt? Surely not!
I have pulled a few fabrics from my stash and cut them into apple cores but together they lack a certain something, I’m not sure what exactly and don’t want to cut any more till I know what it is that’s missing; the dreaded yellow perhaps, or maybe greater variation of darks and lights, at the moment what I have cut are mainly mid shades. I shall need to pull out a great many more fabrics from my stash and throw them in a pile I think, then pare it back, pulling out the ones that don’t work, till I have the right mix.
Having said that I think one of my weaknesses is a need to control, perhaps, as it’s a scrap quilt I should just throw it all in and let it all hang out, wherever the fabrics fall… if you see what I mean, and pardon my clichés.
The truth is I didn’t pull out of my stash the fabrics I love, I pulled out the fabrics I could spare, the unloved and languishing bits, so it’s no wonder they aren’t yet making an inspiring mix. I need inspiration, one or two well chosen fabrics to pull it all together, or white, or navy? Oh Help! What I really need is a few days of free time in my studio to let this quilt come together.
I hit another snag, the mark didn’t show at all on the green fabric. Work came to a full stop again. Till I worked out that if I put the gold thread on the bottom bobbin and marked the quilting out on the lining, I could achieve the result I wanted, problem solved.
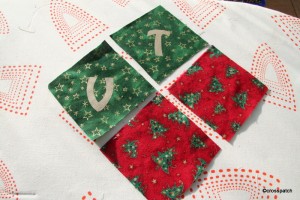
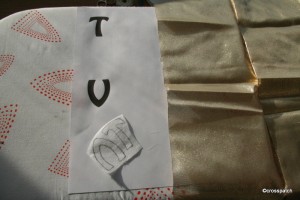
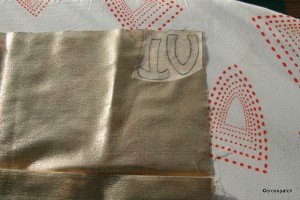
I wanted to make a swing tag for each stocking. A gold initial on a swing tag to hang from each one. I’d originally planned to put the initial on the red material of the stocking but realised it would not work visually; the material is too busy and the initial would not be well defined, so I chose the green fabric.
I chose a simple font, this is Hobo, which is chunky and nicely shaped without any difficult to cut out narrow bits which would have made appliqué complicated. I enlarged the font in bold, and traced the initials onto bondaweb (if you are going to do this do it rough side up or print off a reversed initial, or your finished initial will be the wrong way round).
I ironed the bondaweb onto some gold tissue fabric, cut out, peeled off and ironed into the green fabric. If this swing tag was likely to be washed I’d consider some stitching round the edge to keep it in place but I don’t think it will be necessary.
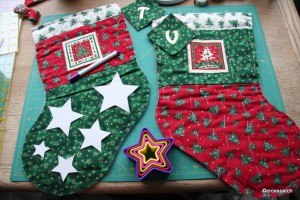
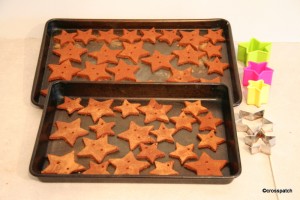
To quilt my stockings I was struggling to find a suitable quilting pattern, I’d initially thought of using a holly and berry pattern I already had but it wasn’t right, then looking at the green fabric I realised throughout all the co-ordinating fabrics there were 5 pointed stars. Coincidentally I’d just bought a set of star cookie cutters. I drew round the 5 star cutters onto cardboard, the points were a little rounded which I didn’t want, so I cut them out sharper. I used the smallest star along the top edge of the stocking, the middle size down the sides of the panels, and all 5 size stars on the foot of the stocking.
Next problem! I planned to use an air erasable pen to mark the shapes onto the stocking, but in the bright sunshine streaming into the room, the mark was disappearing before I could stitch the stars. I gave up, and found something else to do till it went dark.
Then moving on to the foot of the stocking, I hit another snag, the mark didn’t show at all on the green fabric. Work came to a full stop again. Till I worked out that if I put the gold thread on the bottom bobbin and marked the quilting out on the lining, I could achieve the result I wanted, problem solved.
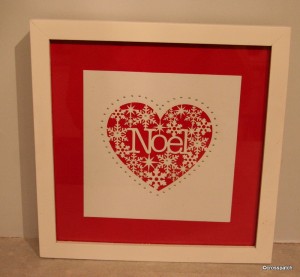
Sometimes I receive a Christmas card which I like too much to throw away on 12th night. this is one way to preserve them.
Sometimes I receive a Christmas card which I like too much to throw away on 12th night.
I tend to keep some maybe just in case no-one sends me a card next year! Perhaps when I’m old and friendless I’ll be able to put up cards that I have kept and still feel surrounded by the love of old friends, who are no longer around to send cards.
This card I loved so much I wanted to make something with it, so I decided to frame it, it will still get packed away with the Christmas decorations and come out every year but it will not get tatty or bent out of shape.
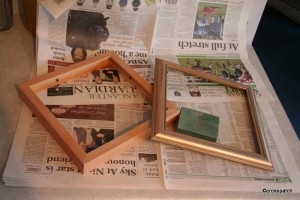
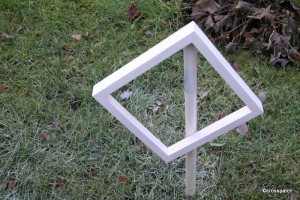
I took charity shop frames,
sanded and spray painted them,
used red wrapping paper to mount the card on.
Wanting to have something to hang alongside it and not being able to find another card of a similar type I bought a little felt tree decoration, from a budget store, it doesn’t entirely work , I’ll keep looking out for another paper cut card.
there was supposed to be a delightful smell of cinnamon floating through the house as they cooked, well I had the most gruesome of colds and couldn’t smell a thing,
A few years ago I was intrigued by something I saw in a magazine, cinnamon stars which look like gingerbread but are made of apple sauce and ground cinnamon, and were said to smell wonderfully and last for years.(NB, These are decorative only, not for eating) What an excellent idea I thought, but no recipe. Recently on Pinterest I found a number of pins which gave instructions so I decided to have go.
.
A cup of apple sauce liquidised to make sure there were no lumps in it.
A cup and a half of ground cinnamon and extra to use for rolling out
Mix together to form a dough, roll out to a quarter inch thick
Cut with shaped cutters of your choice, I bought some star cutters specially.
(and then found the ones I had worked better)I think the mixture I had wasn’t dry enough, and so the shapes were a little ragged round the edges, a drier mixture might have produced a crisper edge.
Use a skewer to make a hanging hole in each one, or two if you want to string them on a ribbon like a garland.
Bake for an hour at 180c or the lowest gas setting.
Now comes the disappointing bit, there was supposed to be a delightful smell of cinnamon floating through the house as they cooked, well I had the most gruesome of colds and couldn’t smell a thing, but then neither could anyone else. When they were cooked they looked rather mottled and cracked, not like gingerbread at all, and they don’t smell of much either. I will take a nail file to the edges in the hope of improving the finish, and if I think it’s worth it I’ll string them on ribbon for a garland to go on the tree, next year.
If you fancy having a go yourself, have plenty of cinnamon to hand to make sure you achieve the right consistency, and to make sure the edges are crisp. If you don’t have star cutters, hearts or any Christmas shape would work , or gingerbread man perhaps.
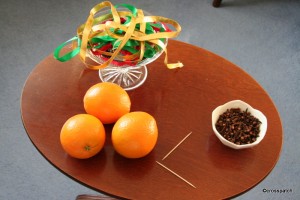
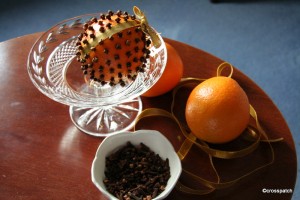
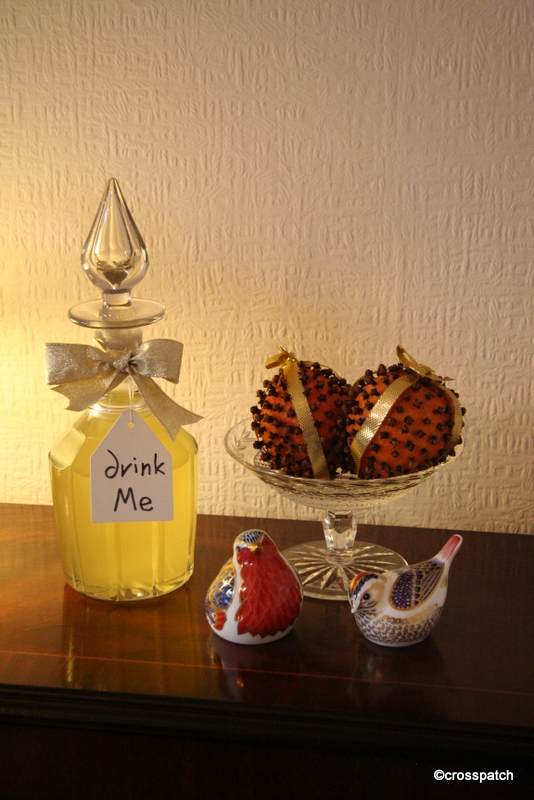
I love the smell of clove oranges and always make some for Christmas, and put them by my chair so that I can enjoy the fragrance, heaven!
In the run up to Christmas, I always think I will have time to be creative and make gifts rather than buying them, Pinterest has a lot to answer for!
I also thought that I would have time to blog what I have made, then Christmas arrived, work went viral, home life was hectic and the cold virus crept up to bite me too. I didn’t finish the present wrapping till 22.20 on Christmas Eve, and the cards got posted on the last posting day. So let me tell you what I did manage to achieve.
nearly ready
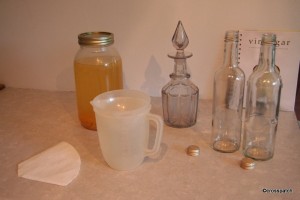
The Limoncello (see a still life with lemons) was filtered and bottled, I tried the coffee filters but it didn’t work very well, so I used a double layer of muslin in a sieve over a funnel, which worked much better. It made a litre and a half of Limoncello. The 500ml bottles were cordial bottles that I have put aside once empty specifically for the purpose. I kept one bottle for myself, gave one to my sister, and put the rest in a beautiful Victorian cut glass decanter I found at an antiques fair in the summer and gave it to my Mum.
There’s something very evocative of Christmas in the smell of spices, I love the smell of clove oranges and always make some for Christmas, and put them by my chair so that I can enjoy the fragrance, heaven! If you want them to last you should wrap them in paper and put them in a warm dry place till they have dried, and then they won’t go mouldy, but if you do they look desiccated and not nearly so pretty. I prefer my clove oranges to have a short but pretty lifespan.
They are so easy to make, just take an orange, a cocktail stick, some ribbon and some cloves. I tie the ribbon on first giving me four quarters to fill, and allowing the cloves to be placed to keep the ribbon in place. Use a cocktail stick to make a hole to push the clove into, if you try to use the clove to make the hole you will find the bud of the clove will be crushed by your finger as you push it in, and it will fall off leaving just the stem behind.
They make nice little stocking gifts wrapped in cellophane, but you’d need to make them the night before they are given to be sure they are given in perfect condition.